
DSLR Camera Exposure settings for Professional photography
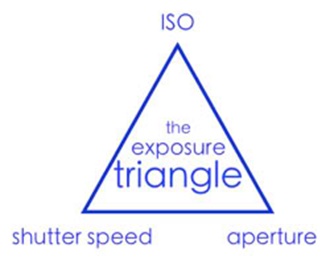
In photography “Exposure” means how much light will come on film or CCD. Light is very important in photos. So if you make a good and beautiful photo you should learn a system to control the light direct and indirect or concept about exposure. However, the matter is technical and complex. The camera makes Exposure settings at power and shots digital camera’s auto mode, but we have too little knowledge in this fact. If we will compare Exposure with a triangle, then the three angles of the triangle are ISO, Aperture, and Shutter Speed.
Select Auto Exposure for Better Photography with DSLR Camera
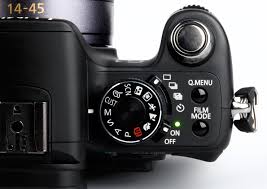
I have said it before that camera makes itself the exposure settings but if you understand the auto-exposure technique, it can be manipulated directly Usually maximum modern digital cameras collect data about light from the different places of focus area (collect more data from the center position) and it makes Exposure setting average all data. It collects data at the moment of pressing half of the shutter button.
For more enlightening a photo holds the shutter button with half-pressure being focused in the viewfinder from the photo’s focus area to the darkest surrounding area. Keeping the shutter button fixed in this place, move your camera and make the frame in the viewfinder where you will take photos.
Then take a shot by pressing the rest of the shutter button. Since the camera relatively makes exposure settings based on the data of dark place, so your photo will be more shiny and bright. Again if you want to reduce a photo’s brightness of light, you can be manipulated auto exposure. Examine it, the technique could be used. Remember when taking a photo in auto mode, you noticed at the focus area that the same amount of light was everywhere. If it seems too complex with including sunlit, shadow, and dark in one particular side, then aperture settings may not be correct in auto mode.

Setup Manual Exposure Setting for Nice Photography
We have discussed little manual exposure at “The Digital Camera Tutorial” episode. Here we will try to make a detailed discussion. Shutter Speed means a round hole of light entering through the lens after pressing the shutter button or how much time the window will open and Apertures means to determine how much the round window size (Diameter) will.
A large aperture (Large window size) = small f-number
A small aperture (Small window size) = larger f-number
Shutter Speed is expressed in fractions of a sec of the time.
Generally in sunny days if the ‘125 16’ or ‘500 8’ is shown in the viewfinder of the camera or display, its first number means: Shutter Speed is 125 Part of 1 sec, or 500 percent of 1 sec and the second number is a fraction which meaning is-the focal lens of the lens is divided by the round window diameter, then the quotient is 16 (80mm / 5mm = f16) or 8 (160mm / 20mm = f8).
-
More About DSLR Camera Apertures
The size of Aperture like ’round open window is expressed with f/number. For example: f / 2.8, f / 4, f / 5.6, f / 8, f / 22, etc. Selecting a series of this number, at every step the size of the windows will double if it runs at small numbers and it is getting half in small at every step if it moves at a large number. Notice that, the shutter speed is like “open window period ‘½ s – ¼ s – 1/8 s – 1/15 s – 1/30 s – 1/60 s – 1/125 s – 1/250 s – 1/500 s at every step it increases double or decreases half.
So if you change one step of the aperture value to have the window size half and one step change of shutter speed value to have the window size double at the period of keeping open it. Then the light effect will be the same as before. This is the mutual relationship between Aperture and Shutter Speed.
DSLR Camera Apertures
We need to be clear about another thing before the discussion about these apply methods – Depth of Field. In photography depth of field means to determine how much distance or amount comes under focus. A large depth of field means the photo subject and everything near and far of a subject will be in focus. In this way, if you want to increase the Depth of field so keep the size small of Aperture as like “Round Open Window». That means the f / number will be larger.
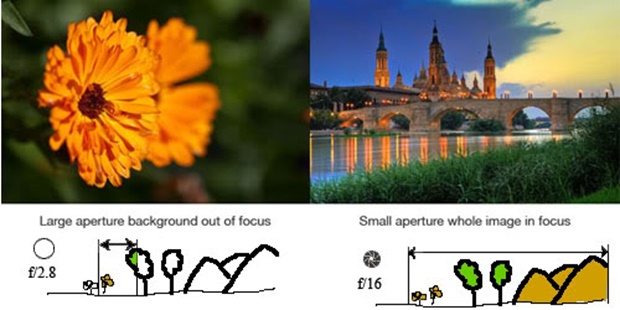
Flowers have been shot on the left side with the aperture f / 2.8; the results in a small depth of field, only the flower is in focus, there is nothing behind it. Having been shot on the right side with the aperture f / 16, the results large depth of field; focus on things near and far. Although it seems illogical to hear, try to remember:
Large Aperture = Large Hole = Low Number = Small Depth
Small Aperture = Small Hole = High Number = Large Depth
Now we can say Depth of Field depends on two factors: the distance of the camera from the subject and the Aperture setting.
-
Shutter Speed in DSLR Camera for Photography
We know that the shutter speed and aperture both are the amounts of light-enhancing and to reduce tools. Aperture does small-large the light entering the hole and Shutter Speed controls the amount of light keeping open it for a few times. Instead of Aperture the amount of light controls with the Shutter Speed where the subject is dynamic. Generally moving car, sport, children racing shots should be taken at fast shutter speed for better photography.
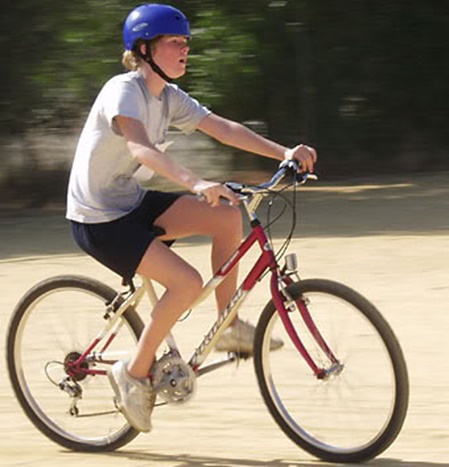
The photo of the child in a cycling position has been raised to move the camera by targeting the fast Shutter speed setting and the cycle. So the background is blurred. That’s good; it is not possible to come in the photo background something unexpected to lose traction. Understanding the difference between fast and slow shutter speed to see the image below:
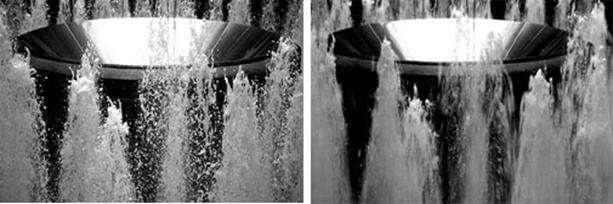
Two images of the same source. Fast shutter speed takes the shot on the left side of the image – the hole was opened for entering light in sensor through lens remaining 500 percent for 1 second. Every point of water can be seen floating in the air. The right side of the image has been taken by slow shutter speed (30 percent 1 second). At the time of slow shutter speed on the camera, it is better to take shots keeping it above something. Otherwise, the possibility of photo blurring increases by hand shivering.
3. How ISO (Sensitivity) work When Photo shooting With DSLR Camera
How much digital camera CCD or CMOS sensors are sensitive to light touch or how quickly it will react is determined by the ISO number? Low ISO rating of the money it will need more light for less sensitivity to the actual exposure. High ISO Rating will be the case for the opposite. Usually ISO 100 – ISO 400 is used much. The higher the ISO rating will be able to better the camera in low-light pictures. Without it, the faster the shutter speeds when taking a shot to keep the ISO Rating Report. High ISO rating of the photo some of the negative aspects of the ‘noise’ is made of similar photos – three types of ISO (100, 400, and 1600) to take the shot.

-
Contrasts and colors In Professional Photography With DSLR Camera
Contrast means the difference between a picture’s brightest and darkest color density.
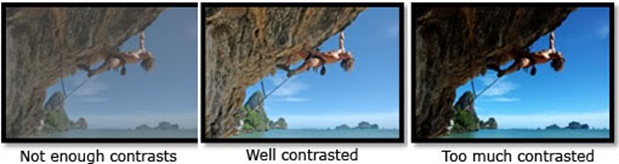
The light source, amount, layout and accurate expose combination can possibly balance contrast and color.
Conclusion
Without the need for manual exposure should be avoided. In most cases, the latest camera models are the right expose in auto mode. When your mind is not like the photo you can see the experiment. SLR cameras do not have the words, now part of the latest compact cameras has a manual exposure facility. No specific ISO, Aperture, and Shutter Speed- Quality value that has a photo of your camera, another camera exposure value at the same time there is no guarantee that the photo will be the same quality. Camera model, lens, based on the features and value of the exposure, but the photos of the Quality may vary.
I hope three episodes of my writing about the camera and photography basics of the art will use for new and general users of this new camera.