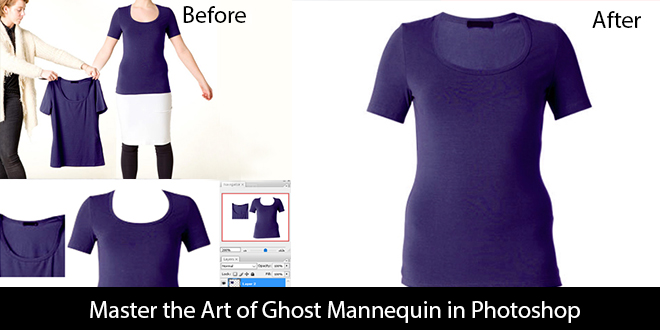
Mannequin is also known as neck joint service that implies to showcase the image in a right manner by hiding the mannequin layer. The clothing product is displayed to the audience after using some photo editing tactics. In this digital world, gaining the attention of the people is quite tough and you cannot imagine getting that without an impressive imagery.
Any webshop that deals in product selling has to create a perfect striking photography to capture the eye balls of the viewers. Fashion photography, model photography, and clothing photography looks really nice with ghost mannequin effect. Let’s dig deep into the easiest way of ghost mannequin or joining the clothing neck in Photoshop:
Open the File in Photoshop
Open the front half image in Photoshop and enable the layers panel. You will see that this layer is locked. Create a new background layer after selecting the mannequin image. Put white color in this layer as it will make up your overall background. To be organized, you must label the layers so it is easy to identify them at later stages.
Use Pen Tool
Now use the pen tool to remove the background as this tool works best. You need skills to use the pen tool because it is not so easy. Create a path around the product that is present in the front layer.
Remove the Background
Once done with the selection of the product, it is the time to remove the background. For that, go to Select>Inverse, which is located at the top of the Photoshop window. The selection i.e. the marching ants will be placed around the background now which were previously around the product. Press Delete and the product will now be on the white background.
Combine the Images
The original image is hidden under the white background. Open the back half of the image in Photoshop and press Ctrl A, Ctrl C and Ctrl V. (Remember in the first step you opened the front half.) Select the back half and move it a bit to get the perfect positioning that make both the front and half look as if they were already combined.
Get the Natural Look
To make it look more natural, use the eraser tool and gradually rub the front layer so that it blends well with the back layer. Make sure to keep the eraser tool set to brush mode with opacity of 25%.
It’s done! This is how you can create ghost mannequin in Photoshop. Hope you understand it well and now you can do it yourself.