
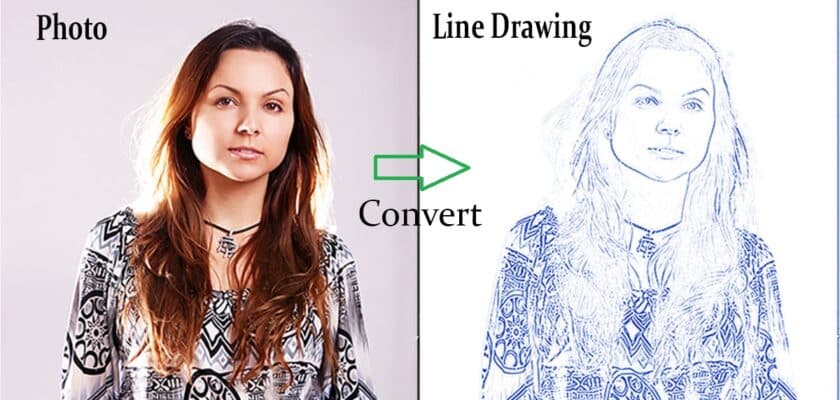
Turning a picture into a line sketch can make your website, social media, or creative projects look great. You could hire someone for this, but it often costs a lot.
This guide will show you an easy way to convert image line art with Adobe Photoshop. You will get the steps you need to turn any photo into a line art sketch that looks hand-drawn.
Preparing Your Photo for Line Drawing
Before you start putting any filters on, it is important to get your original image ready. If you want a good line drawing effect, you need to do this first. Not every photo works for this, and some simple changes at the start can really help. Take time to find the right picture and focus on its main parts. This will make your results look clear and good.
Choosing the right image for the best results
The quality of your final line drawing depends a lot on the original image you choose. For the best results, start with a high-resolution photo. The photo should have sharp contrast and a clear subject. Avoid photos that are blurry. It is very important that your picture is crisp and clear.
Adjusting contrast and clarity before starting
After picking the image, first change the contrast. This will darken some lighter parts of the subject. The Curves adjustment is a great tool for this job. It gives you more control over the tones in the photo. When you make the contrast higher, it helps you see the outlines better. This is key to making good artistic sketches.
To make an image look like a sketch in Photoshop, begin with these important changes. The Curves tool helps you pick out light or dark areas. You can change these parts to stand out more. You will not be using just one setting for every picture. Take your time and see what will be right for your image. This helps get it ready for the artistic sketch effect.
Follow these steps to use the Curves tool you adjust the contrast:
- Go to Image > Adjustments > Curves.
- Click the line in the Curves box to make a point.
- Pull the curve down so the middle tones and lighter areas of your subject get darker.
- Hit OK after you see the subject stand out from the background with enough contrast.
Essential Photoshop Layer Setup for Line Art
A clean and tidy layer setup is the base of how this works. You should not work on just one image. Use many layers to build the line art, adding each part a step at a time. With this non-destructive workflow, you have the most flexibility. You can always change or improve your artwork whenever you need.
If you set up the layers the right way, you can make many effects. The look can be like a simple stencil or a detailed drawing for a coloring page. It is like having a digital generator for your artwork. Every layer brings something new, and the last layer makes your piece complete.
Duplicating, naming, and organizing layers
To start, you need to make a neat workspace. Do this by making copies of your original image layer. This lets you add effects without changing the real photo. Altogether, you will have four layers that look the same. You will add an adjustment layer as well. To make a copy, just right-click the layer in the Layers panel and pick “Duplicate Layer.”
After you get your four layers, you should give each one a clear name. This helps you not get mixed up as you go. You can keep the original image as “Background.” Name the first copy “Inverted.” Name the next one “Sketch.” Put “Cross hatch” on the top one. Keeping names simple helps you stay on track and makes your process for a line drawing easy.
This setup is important when you want to do more with the line drawing or the sketch. For example, if you want the lines to be thicker or look more creative in Photoshop, you need to know how to use each layer by itself. With this tidy setup, you have a good way to add new effects and make changes without losing your place.
Converting your image to grayscale for crisp outlines
If you want your photo to look like a pencil sketch or ink drawing, you first need to take out all the color. Instead of just changing it to black and white, it’s better to use an adjustment layer. This way, you keep your main photo the same. You will be able to turn the effect on or off. This is an important step if you want to make your picture look like a pencil sketch in Photoshop.
Adding a Hue/Saturation adjustment layer is easy. Put it at the top of your layers. This will let it work on everything below it. Then, open the Properties panel for the layer. Pull the saturation slider all the way to the left. Your image is now black and white and ready for the next steps in the sketch process.
Follow these steps to make your image black and white:
- Select the top layer in your Layers panel and click the Adjustment Layer icon (a half-black, half-white circle).
- Choose Hue/Saturation from the menu.
- In the Properties panel, drag the Saturation slider to the far left (-100).
Step-by-Step Process to Turn a Photo into a Line Drawing
With your photo ready and layers set, you can start making the line drawing effect. In this part, you use blending modes and filters to trace the outlines of your subject for you. It’s like you get a picture outline maker inside Photoshop.
Next, you can see your grayscale photo turn into a clean and simple sketch. You can stop here with a basic line drawing effect, or you can keep going and add more to build detailed illustrations. Let’s go over which filters to use and what settings to pick.
Applying key filters for sketch effects
The primary sketch effect is achieved by cleverly manipulating your “Inverted” layer. First, you’ll change its blending mode, which will likely make your canvas appear completely white. Don’t worry, this is the expected result. The real transformation happens when you apply a blur filter. This is a crucial step when you turn an image into a sketch in Photoshop.
You’ll use the Gaussian Blur filter to reveal the lines of your image. As you adjust the filter’s radius, you can watch the lines appear in the preview window. A smaller radius creates fine, thin lines, while a larger radius produces thicker, more shaded lines. This single filter does most of the heavy lifting in creating the initial sketch.
Here is a summary of the key filters and modes for the initial sketch effect:
| Layer/Action | Setting/Filter | Purpose |
| “Inverted” Layer | Color Dodge | Changes how the layer interacts with the one below it. |
| “Inverted” Layer | Invert (CTRL+I) | Inverts the colors, making the layer seem to disappear. |
| “Inverted” Layer | Gaussian Blur | Reveals the outlines of the image as a sketch. |
Tweaking blending modes and line thickness for a custom style
After you have made the basic outline of your line drawing, you might want to change how it looks. How can you make the lines in your drawing thicker when you use Photoshop? One good way is to add a new layer. This new layer will help you make the lines stand out more. To do this, copy your original layer again. Then, apply the “Glowing Edges” filter to it. This will make a fresh set of outlines that will help strengthen the first ones.
Next, invert this new layer. After that, set it to “Multiply” blending mode. This will make the lines in your line drawing or line art look darker and thicker. This method gives you more ways to control how thick you want your lines. It is great if you want to move away from a simple, minimalist line art and try a bolder style. You can change the settings in “Glowing Edges” to adjust how wide and bright those extra strokes look.
To make your line drawing strokes thicker:
- Duplicate your original layer and move it above the “Inverted” layer.
- Go to Filter > Filter Gallery > Stylize > Glowing Edges.
- Invert this new layer (CTRL+I) and set its Blending Mode to Multiply.
- This will instantly make the lines in your drawing darker and thicker.
Enhancing and Refining Your Line Drawing
Creating the first line drawing is just part of the work. The things you do at the end will make your art better and turn a plain effect into detailed line art. Sharpening your sketch means cleaning up any rough spots. You also pick out certain details to make the sketch look real and good.
These last steps matter a lot if you are making artistic sketches for a portfolio or making a design for a tattoo artist. When you make a clean and sharp drawing but still keep all the details, it looks more finished. It shows that you put thought into it. Here is how you can clean up and sharpen your line drawing to get nice, detailed line art, whether it is for a sketch or a tattoo design.
Preserving important photo details in the sketch
As you use filters on your photo, you may lose some important details. These can be covered up or go missing. To get them back, you can make a stamped layer. This stamped layer is one copy that puts together all your layers you can already see. It lets you do final edits without changing your other layers. After you make it, you can use it to clean up your sketch.
When you have the stamped layer picked, use the Brush tool to paint over smudges or any dark spots on the background. Set your main color to white. Take your time and erase any parts you do not want. This lets you control your work, so your drawing stays sharp and clear. This is very good for tattoo designs, where the line art and details must be right.
Many free apps help you turn a photo into line art, but most do not help you keep small, important parts. With Photoshop, you can make a stamped layer and fix your image by hand. This way, your sketch can look really good and professional.
Tips for cleaner lines and artistic variations
Getting cleaner lines and fun changes in your art in Photoshop happens with small moves at the end. One good way to do this is by changing how see-through your “Sketch” and “Cross hatch” layers are. When you lower how strong these layers show, the shading from the pencil gets lighter. This can make the sketch look more clean and soft.
There is also a step at the end called artifact removal. That means if your picture has little marks or blurry spots in the background, you should check for those. The best way to fix this is with the Brush tool on a new stamped layer. The new stamped layer keeps the main lines safe and lets you paint out smudges easy. This way is useful to make other art looks too, like the clean look in anime drawings.
A few things to know for a neat finish:
- Change how clear the “Sketch” and “Cross hatch” layers are. Try around 60-70% for softer shading.
- Don’t change the “Inverted” or “Background” layers’ clarity. Making these lighter can fade the main lines.
- Make a stamped layer (SHIFT+CTRL+ALT+E) for the last clean-up. This keeps from hurting the original art.
- Use a white Brush tool on the stamped layer to get rid of smudges or dots you don’t want.
This helps your sketch get the smooth lines and clean look many people want in their anime art.
Adding Creative Effects: Pencil Sketches and Custom Art Styles
After you get a clean line drawing, you can start to add creative effects. This helps you build your own art style. With these steps, you turn a simple outline into a pencil sketch. You add shading and texture to make it look richer. This works well for coloring page projects or other creative projects.
If you layer filters and blur, you get many looks. Some look like soft charcoal shading. Others look like sharp cross-hatching. You get more choices and control than most deep learning tools offer. This lets you control the sketch and change the style just how you want.
Making strokes thicker or thinner for the desired impact
The weight of your strokes can change how your line drawing looks. You can set this in Photoshop. If you want thin strokes, use a small Gaussian Blur radius on your “Inverted” layer. This gives you fine lines that are nice for detailed artistic sketches.
Want thick strokes instead? Just turn up the Gaussian Blur radius. This will give you bold lines. For even thicker strokes, use the “Glowing Edges” filter on a copy of your layer, like you did before. Change the Edge Width setting there. This will help your outlines stand out and look strong.
Trying both thin and thick strokes will help you get the look you want in your image. This control matters a lot. It helps you choose the mood and style for your line drawing, whether you want something soft or something that gets people’s attention.
Exploring pencil sketch, cross-hatch, and pen effects
To make your picture look like a real pencil sketch in Photoshop, you need to add some texture and some shading. This part is done by your “Sketch” and “Cross-hatch” layers. First, pick the “Sketch” layer. Then, choose the “Charcoal” filter from the Filter Gallery. It will put soft, smudged shading on your line drawing, almost like it was drawn with a pencil.
If you want to get a more detailed and hand-drawn look, go to your “Cross-hatch” layer. Use the “Torn Edges” filter from the Filter Gallery first. After that, put the “Graphic Pen” filter on top. This will add a cross-hatching pattern, which lets your pencil sketch look deeper and more stylish. Set both the “Sketch” and “Cross-hatch” layers’ blend modes to “Multiply.” It will make their sketch and ink textures mix right into the drawing lines below. If you want things to look softer and more natural at the top, you can also use a little Motion Blur.
Here are some sketch effects that you can copy in Photoshop:
- Pencil Sketch: This is done with the Charcoal filter and by making the layer see-through. You get a rough and relaxed look.
- Cross-Hatch/Pen Effects: The Graphic Pen filter helps make hard, sharp ink lines for your sketch.
- Chalk and Charcoal: Use filters that put down heavy, rough lines and
Saving and Exporting Your Final Line Drawing
After you finish your artwork, you need to save and export it. The way you do this depends on where you want to use it. You could share it online or print it. Pick the right file format and settings to keep your artwork looking good.
When you export, you can choose formats like JPG or PNG. Each type has its own use. You may want to add a small watermark on your artwork if you share it with many people. Make sure to check your export settings. That way, your drawing will look just as it should outside of Photoshop.
Choosing file formats for online sharing and printing
When you want to save your line drawing, the file format is important. If you want to put it online or share on social media, JPG works well. It makes the file smaller, so it loads fast. This is good for websites. But, if your line drawing has a clear or see-through background, you have to use PNG, because JPG does not allow you to keep that clear part.
If you need your line drawing for a printed thing, you should keep the quality high. You can save as a high-quality JPG or a TIFF file. Make sure the resolution is high, about 300 DPI, so your line drawing does not look blocky or lose detail after it is printed.
Some people use Photoshop for more control when changing a photo to a line drawing. But if you just want to do it quick online, many websites let you do this in one step. These websites are fast. Still, you do not get much say over the file format or how good the line drawing looks when you do it this way, compared to using Photoshop.
Best practices for resolution and background preservation
To make sure your final line drawing looks sharp and pro, you need to begin with a high-resolution original image. If the image isn’t clear, you can’t add detail later. That’s why having a high-quality source file is a must. When you export the artwork, keep the resolution high, especially if you will print it later.
One good thing about this Photoshop way is that it gives you control over the background. If you use layers, you can hide the original background layer. This lets you export your line art or sketch with a transparent background. Save your file as a PNG so you keep this see-through effect. It helps when you want your line art to go on a different color in your project or bigger design work.
There are many people who want to know which website lets them make line art from a picture without installing anything. The sites you find, like Fotor or LunaPic, can do the job, but they don’t often keep the same control over resolution and the see-through background like Photoshop does.
- Always start with a high-resolution photo.
- To create a transparent background, hide the background layer and export as a PNG.
- For print, export at 300 DPI to ensure high quality.
Conclusion
In the end, turning a photo into a line drawing in Photoshop can be easy and fun for most people. You can follow the guide above to make your pictures into line art that shows the real feel of your photo and lets your art stand out. Try out the different effects and tools. This will help you get your own special style. Share your line art with others. If you want help or have questions on how to do it, you can get a free talk. Enjoy making your line drawing!
Frequently Asked Questions
Can I convert a photo to a line drawing online without Photoshop?
Yes, you can use an online generator or app to turn your photo into a sketch. This can be done fast. Many websites use deep learning for this and give you a sketch right away. You do not need to download any software. But these tools have fewer controls and options for your photo than Photoshop.
What free apps can turn a picture into line art while keeping details?
Apps like PicsArt and Fotor let you change a photo or selfies into a line sketch. These apps act as a picture outline maker and give you the tools to make a sketch from a photo. However, it can be hard to keep all the small details in the sketch. Many free versions of these apps also add a watermark to your illustrations.
How do I create thicker or more artistic strokes in my Photoshop line drawing?
To change how thick the lines are, you can change the Gaussian Blur radius on your inverted layer. Make the radius bigger if you want the lines to be thicker. If you want to get more artistic sketches, you can copy your original image. Then, use the “Glowing Edges” filter on it. After that, set the layer’s blend mode to Multiply.