GIFs are everywhere—on social media, in emails, and even in digital ads. However, using them straight out of the box doesn’t always suffice. Sometimes you need to fine-tune the colors, slow down the speed, or add text that fits your message. Knowing how to edit GIFs in Photoshop gives you full creative control, whether you’re polishing content for a client or adding a professional touch to your own projects. This guide will walk you through everything step by step so you can edit GIFs in Photoshop.
Step-by-step guide to edit GIFs in Photoshop:
Preparing Your GIF for Editing in Photoshop
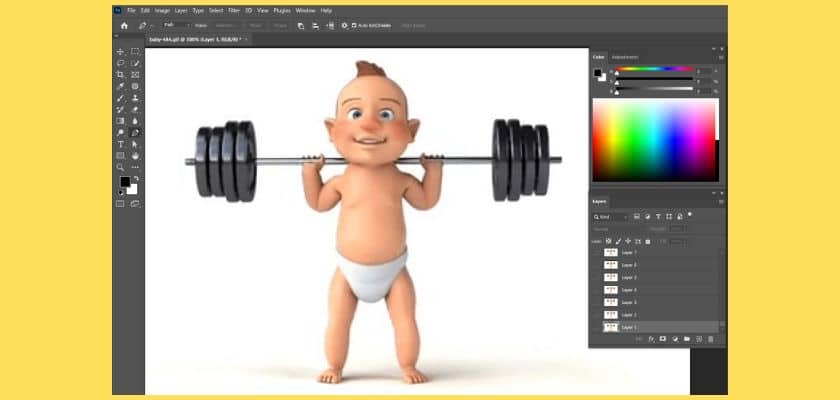
Before you start making any changes, you need to set up your GIF file correctly in Photoshop. This file format is not like a normal picture. A GIF File has more than one layer, and these layers work together to make an animation. Photoshop needs to see these layers in the right order.
If you prefer to edit GIFs outside of Photoshop, there are several online GIF editors that allow frame-by-frame editing, such as EZGIF, GIFMaker, and Piskel. These tools offer a straightforward way to adjust each frame of your GIF image files without requiring advanced software.
Importing a GIF into Photoshop
First, open the GIF file you want to work on in Adobe Photoshop. To get started, go to the top of your screen and click “File.” After that, choose “Open.” Find the GIF on your computer and hit the “Open” button. This will bring the GIF into Photoshop.
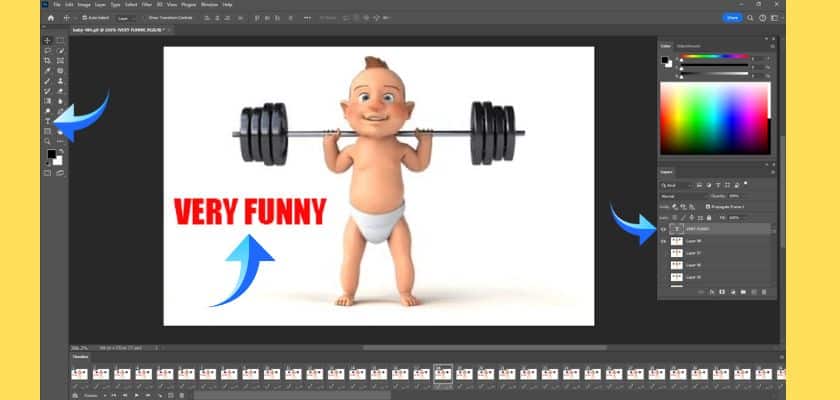
You will see several layers in Photoshop, with each frame having its own layer. You can look for all these frames in the layers panel. It is usually on the right side of the screen.
Accessing the Timeline and Layers Panels
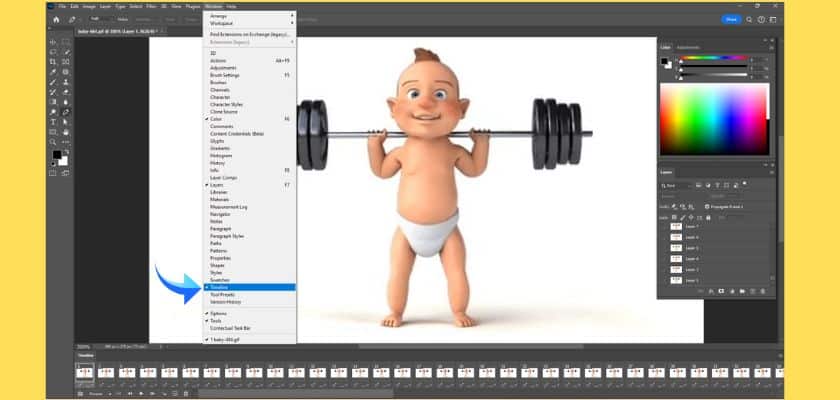
After opening the GIF file next important thing is to check its animation sequence. To view this, you need to enable the Timeline panel. Go to the “Window” tab in the top menu. Then, click on “Timeline.” You will see a new panel at the bottom of your workspace. It will show each frame of your GIF in order. This area lets you control the timing and movement of your animation.
You should also have your Layers panel open. If it is not there, you can turn it on from the “Window” menu as well. The Timeline and Layers panels work together in Photoshop. When you pick a frame in the timeline, the matching layer is highlighted in the Layers panel. The same thing happens if you select a layer. This link is important when you want to edit a certain part of your GIF.
Editing GIF Frames and Content
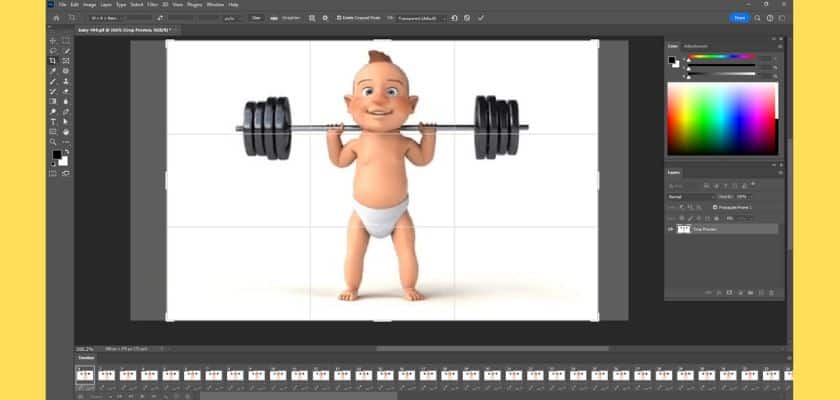
Now that your GIF is open and the timeline is working, you can start editing. You can crop a frame, resize it, or even add new things. You can put text on a GIF or add an image over the top. These are some of the ways you can use the timeline in Photoshop to change how your GIF looks and make it feel special.
1. Cropping, Resizing, and Adjusting Each Frame
To crop and resize a frame, select the layer, then press Ctrl+T on a Windows computer or Cmd+T on a Mac. This will turn on the Transform tool. You can drag the corners to make the image bigger or smaller. Press Enter when you are done.
To move an object to a different position within the frame, select the layer and use the Move tool (V). Just click and drag the layer to where you want it.
To make these tasks fast, you can click on any frame in the timeline panel, then edit its layer in the layers panel. Some important changes you can make in Photoshop include:
- Resizing: The Transform tool (Ctrl+T) helps you make any frame larger or smaller.
- Positioning: The Move tool (V) puts layer content in a new spot.
- Opacity: Use the slider in the Layers panel to adjust the transparency of a layer.
2. Adding Text, Stickers, or Overlay Images
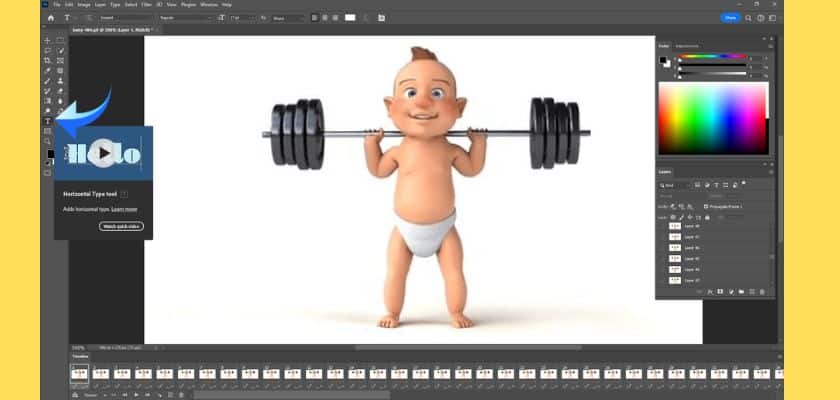
Adding text is a good way to make memes or tell more about your GIF. You can use static text or animated text that changes as the GIF plays. To start, pick the Text tool (T) from the toolbar. In the Layers panel, select the top layer so the text sits above your GIF.
Once you have the tool, click where you want to put your text and type. In the options bar up top, you can change the font, size, and color. If you want static text, just use one layer for your text. For animated text, make a few different text layers and show each one on different frames. You can also add stickers or overlay images as new layers.
Here’s how you can add things to your GIF:
- Static Text: Make one text layer. Keep it visible across every part of the timeline.
- Animated Text: Make a few text layers. Change which layer is visible on each frame.
- Overlay Images: Click “File > Place Embedded” to add a sticker or an image as a new layer.
- Styling: Change the font, color, and size so your GIF looks how you like.
Enhancing Your GIF Animation
You can also work on the basic animation part to make it better. Like, adjust the playback speed. Use some cool effects. Set different ways for it to loop. These things make your frames and graphics come together to create a smooth and clean GIF that people will want to share on social media.
Modifying Playback Speed and Sequence
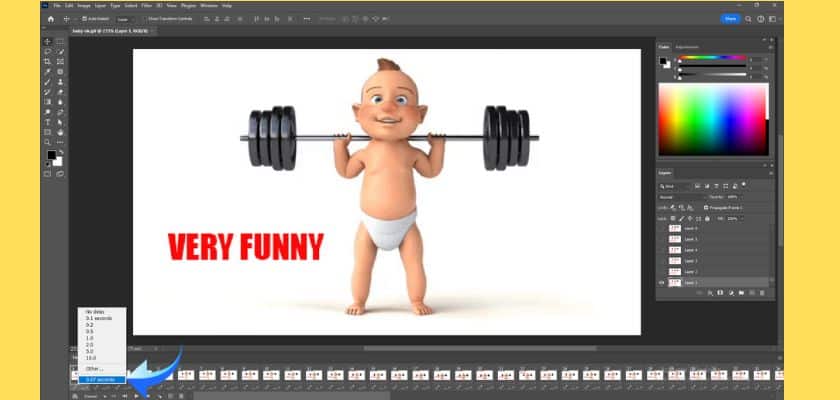
Controlling how fast your GIF moves is simple when you use the timeline panel. Under every frame, you will see a time, like “0.1 sec.” If you click on this time, a menu will show up. Here, you can pick a new delay for that frame. If you use a shorter time, the animation moves faster. If you use a longer time, the animation slows down. You are able to set the time for each frame on its own. It is also possible to select more frames and change them all at once.
There is another setting to think about. In the timeline panel, you decide if your GIF runs one time, a set number of times, or keeps going with “Forever.” Most people choose “Forever” when they share GIFs on social media. This makes the animation play again and again, which is what most want.
These tools let you fully manage the order and pace of your gif animation.
- Change Frame Delay: Click the time below any frame to set a new duration.
- Set Looping: Use the dropdown menu at the bottom of the timeline to select “Once,” “3 times,” or “Forever.”
- Preview Changes: Use the Play button in the timeline to see how your timing adjustments look.
Applying Filters or Effects to Individual Frames
To apply filters or effect, pick a layer then go up to the Filter menu at the top of your screen. There, you will see ways to blur, sharpen, add textures, or use adjustment layers for color you can change later. Only that one frame will get changed when the filter is used.
You get many ways to be creative with your gifs.
- Blur Tool: Use this to make part of a frame soft and let people look at another area.
- Sharpen Tool: Make blurry frames appear clear and look sharp.
- Smudge Tool: Drag areas to make them appear to move.
- Filter Gallery: Open this to explore various cool looks and tricks for your frames.
7. Save the GIF
Once you feel happy with your changes, you need to save your work. On saving time, you must retain all the animation, layers, and timing. If you use it the wrong way to save it, you may end up with a still picture and not a working GIF.
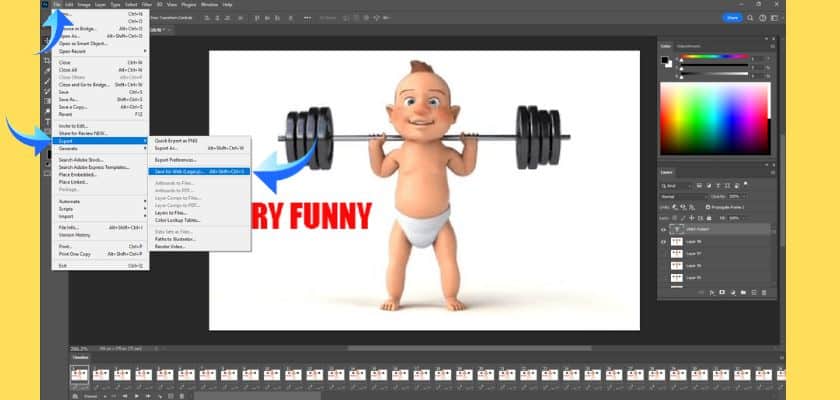
The best way is to use the export tool in Photoshop. To properly export your edited GIF, navigate to “File” > “Export” > “Save for Web (Legacy).” This opens a new window with a variety of optimization options.
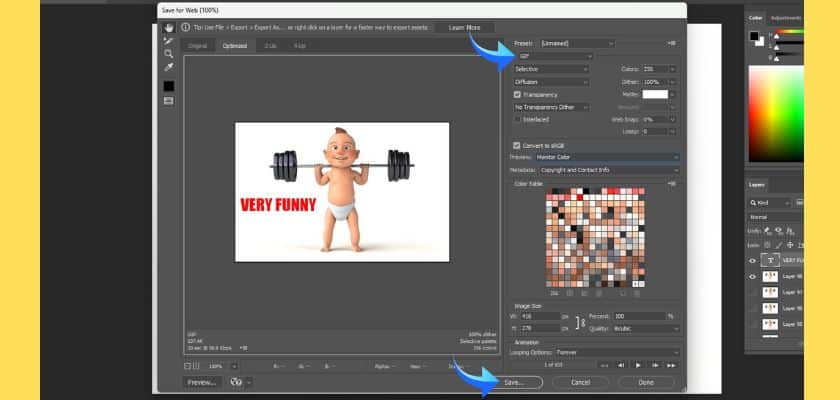
In the “Save for Web” dialog box, ensure the file format in the top-right dropdown is set to “GIF.” Here, you can also adjust the color palette to reduce the file size, though the default settings are often sufficient. You can preview the final animation and its estimated file size at the bottom-left of the window.
Once you are happy with the settings, click the “Save” button. This will prompt you to choose a name and location for your new GIF file.
| Setting | Description | Recommended Value |
| File Format | The type of file to export. | GIF |
| Colors | The number of colors in the palette. Fewer colors mean a smaller file size. | 256 (or lower if quality permits) |
| Dither | Simulates more colors to create smoother gradients. | Diffusion |
| Looping Options | How many times will the animation play? | Forever |
Final Output
Once you save, you will get your final output. This is your fresh, new GIF, fully edited and set to go. You can open the file in any web browser to check. Make sure the animation runs as you want, and all your edits, text, and timing are in place. This step is the last check before you share it.
Now, you can upload your edited GIF to Instagram, TikTok, or your own blog.
Conclusion
To sum up, editing a GIF in Photoshop gives people a lot of creative options. You can crop your gif, add text, or use different effects to make it look good and suit your needs. Changing playback speed and how frames order shows means the animation can catch more attention from users. With some time and practice, you will get better and also make gifs that people notice.

 +
+