
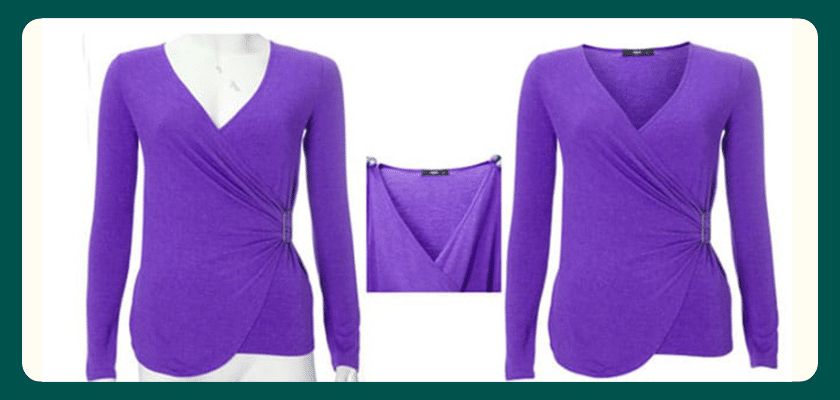
When selling your clothing products online, it’s more appealing to post photos without mannequins like those in your shops. However, this can be difficult as clothes look better on models or mannequins. Don’t worry about this with the Ghost mannequin. This tutorial will show you how to remove the mannequin from the image and Clothes Neck Joint with Neck part photography in Photoshop.
What is the Neck Joint Technique?
The neck joint technique is vital in ghost mannequin editing for fashion photos. Often, a mannequin hides the inner collar or neck of a cloth during shoots. This creates a gap when removing the mannequin digitally.
Editors solve this by adding an image of the inner collar or label to the front view. This makes the final product image look like it’s being worn without the mannequin. It shows all the details.
Tools and Skills Required for Neck Joint Editing
- Software: Adobe Photoshop
- Tools used: Pen Tool, Crop Tool, Eraser Tool, and Brush Tool
- Skills needed: Basic understanding of layers, paths, and selections in Photoshop
- Time required: 20-30 minutes per image
Step-by-Step Guide to Performing a Neck Joint in Photoshop
Step 1: Prepare the Image by Cropping and Duplicating Layers
Open Photoshop and load the cloth image. Ensure it’s the only layer.
Select the Crop Tool in the left toolbar. Remove distractions to spotlight the cloth. Crop closely to enhance this effect.
Duplicate the layer with Ctrl + J (Windows) or Cmd + J (Mac). This creates a backup for safe editing. You can experiment without risk.

Step 2: Remove the Mannequin and Background with the Pen Tool
- Select the Pen Tool from the toolbar. It’s perfect for precise cuts.

- Trace the mannequin’s neckline starting from the top. Follow the cloth edges closely.
- Trace the mannequin’s neckline starting from the top. Follow the cloth edges closely.
- Continue along the jacket’s edges down to the bottom. Keep to the cloth curves.
- Close the path by clicking the starting point. A small “O” will appear, showing completion.

Step 3: Invert the Selection and Delete the Mannequin
- Open the Paths Palette under “Window” if it’s not visible. This is your control center.
- Hold Ctrl (Windows) or Cmd (Mac) and click the path thumbnail to select it.
- Invert the selection with Shift + Ctrl + I (Windows) or Shift + Cmd + I (Mac). This selects the mannequin and background.

- Press Delete to remove the mannequin and background, leaving just the jacket.

Step 4: Add the Inside Collar or Label Image

Step 5: Align and Position the Inside Layer
- Move the inside piece layer below the jacket’s top layer in the Layers Palette.
- Use the Move Tool (V) to align the inside piece, ensuring the inner collar matches the jacket’s neckline.

Place the new piece under the top layer of the jacket’s front. Check the replacement’s success before deciding how many shirts are needed. Use the pen tool to cut through the collar and excess fabric.
Step 6: Refine the Inside Piece and Clean Edges
- Select the Pen Tool to trim excess fabric beyond the collar line.
- Use the Eraser Tool to smooth rough edges, blending the inner collar with the front layer.
- Zoom in to check for imperfections and remove overlaps.

Step 7: Add Shadows and Final Touches
- Apply a subtle shadow under the collar with a 25-pixel brush for depth.
Adjust the shadow layer’s opacity for a natural look.

Step 8: Final Adjustments and Export
- Review the entire image against the original photo for alignment.
- Make final tweaks to brightness, contrast, or color balance.
- Flatten the image by selecting Layer > Flatten Image.
- Export the final image via File > Export > Export As in your desired format.
Pro Tips for Better Neck Joint Editing
Achieving seamless neck joints in photos requires detail. Follow these expert tips for a polished look.
- Take multiple angles. Snap the front and inner collar from various perspectives. For example, capture the front with the head turned, then the inner collar from the side. This variety aids in natural blending.
- Use smart objects. They allow edits without changing the original image. Experiment freely, knowing you can revert to the original.
- Refine selections with layer masks. Avoid direct erasing. Layer masks offer flexibility and accuracy. They help blend the inner collar with the outer cloth smoothly.
- Match colors for harmony. Adjust the inner collar’s color to fit the outer cloth. Tweak hue, saturation, and brightness for a cohesive look. This detail creates appealing images.
Conclusion
Fashion photographers and online businesses must learn the neck joint technique in Photoshop. It’s crucial. This method displays clothes without mannequins. It keeps their shape and looks realistic. This technique lets you combine front and inside views. It will help you create top-notch product images. This, in turn, enhances your online store’s appeal and boosts customer interaction.
Brands like Zara and ASOS illustrate this well. They’ve used Photoshop to craft beautiful product images, increasing sales and customer loyalty. By learning tools like the Pen Tool and Eraser Tool and understanding layers, you can simplify your product photography. This leads to high-quality images that attract customers and differentiate your brand.