
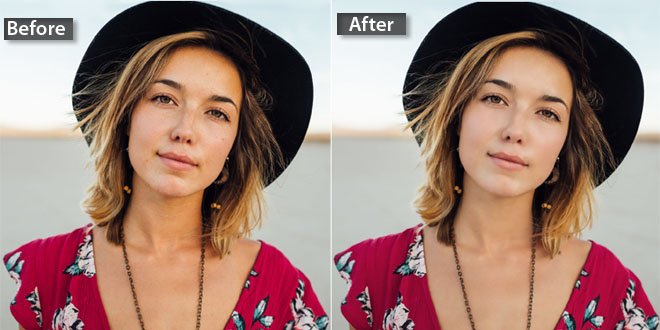
Portrait photography defines someone’s beauty in an exceptional manner. A photographer who has the potential to capture excellent portraits is quite demanded by the industry. To click the aesthetical beauty, portrait photography holds a special place. Plus, it comes in use to enhance the overall appearance taking the subject in focus. Basically, portrait photography is based on the concept of clicking the original personality of a person while highlighting the important features. It is done to make the portrait photo appealing in every manner.
Other than that, portrait photography holds a special place because no one has flawless skin without any scars, marks, or spots. However, to make the images look brilliant and flawless, portrait photo comes into use. To remove the flaws like blemishes or spots from the face, portrait photo editing is used along with the frequency separation technique.
Portrait Photo Editing Frequency Separation Technique:
As you may know, the images are made of pixels and the amount of pixels defines the resolution of an image. Other than pixels, the images also contain frequencies that are further responsible for making the image look flawless. For your knowledge, the frequency is divided into two parts i.e. lower frequency and higher frequency. Both these frequencies are used when the images are made to look spotless and patch-free. To produce awesome retouching results, the frequencies hold a significant place.
How to do portrait photography editing
Open the image in Photoshop which you need to edit. When the image shows up, create a duplicate layer two times and work on that to save the original image if you ruin it by any chance.
Name the layers
When you are done with creating the duplicate copies, it is time to name the layers. The upper layer should be high frequency and the lower layer should be low frequency. To work on the lower layer, hide the upper layer by clicking on the eye icon next to the upper layer.
Effect application
Now you have to apply the Gaussian effect on the lower layer to make things work. Go to Filters>Blur>Gaussian Blur to apply the effect on the lower layer. Then drag the slider to the right to get the desired blurry effect. Now you will see that the wrinkles and pimples will be removed from the face. Once done, now is the time to select the upper layer by clicking on that eye icon again and making it visible.
Image application
Now select the higher frequency layer and apply the image. You will see a dialog box and then you need to click on apply. Blend both the lower and higher frequency layers by selecting subtract as the option. You will see the values which you have to alter to 1 or 2 and the offset value to 128. Now click OK.
Next, change the blending mode of the upper layer to linear light from grey embossed type. The results you see will look original as you want.
Selecting lasso tool
Select the lasso tool by selecting the lower frequency layer. The values are changeable so make sure to change the value to 25 to 27. This value is the feathering value to ensure that the edges look smooth. Go to the Filter and apply Gaussian blur to remove the pimples and spots. Once you are satisfied with the results, you can go ahead to make further changes. Here at this step, you will see the major change in the image as it will look flawless.
Removing pimples and dark spots
The healing brush is an all-time favorite of all the photo editors out there. This tool is used to remove dark spots and pimples from the face. Having pimples is quite a common issue and removing them is possible with a bigger brush size. Press the Alt key when you have picked the healing brush tool and then start removing the pimples to get spotless skin in no time.
To sum up, we would say that portrait photography requires a great level of skills of expertise to get things right. Follow these steps and achieve desired results.