
Did you know? 67% of consumers consider product image quality crucial for buying, especially online. So, the Ghost Mannequin Effect is imperative. This technique makes the clothing look like it’s floating. It showcases the clothes without a mannequin’s distractions.
This effect makes products more attractive. It grabs attention. It helps shoppers imagine how the clothes would look when put on.
In this article, we’ll guide you through the steps to create this stunning Ghost Mannequin effect using Photoshop. But first, we must cover the key techniques of photography. They will ensure your images are perfect for this transformation. Let’s get started.
Table Of Contents
What is the Ghost Mannequin Effect?
The Ghost Mannequin Effect is a photo editing trick. It makes clothes look like they are sported by an invisible person. Photographers first take pictures of clothes on a mannequin. Then, they remove the mannequin using Photoshop. This leaves only the clothes. The result is clothing that looks 3D and alive as if it’s on an invisible body.
This effect is popular in fashion photography. It’s used to show outfits in online stores and catalogs. It helps customers picture how clothes will look on them. Seeing clothes on a mannequin or hanger is less engaging. Shoppers can better imagine how a dress will fit or how a jacket will sit. The Ghost Mannequin Effect makes clothes look more real. This enhances shopping and helps customers decide better.
How to Create the Ghost Mannequin Effect
Creating a ghost mannequin effect in product photography involves two steps: shooting and editing. Both require care and attention.
Step 1: Ghost Mannequin Photography

Ghost Mannequin Photography
Consider a photographer working on a cloudy day. The model showcases a trendy outfit, but the background is dull. To achieve the ghost mannequin effect, take two photos. First, capture the model or mannequin in the outfit. Then, photograph the outfit alone on a plain background or dummy. This method lets you remove the model or mannequin later, creating a ghostly appearance.
Step 2: Ghost Mannequin Effect Editing in Photoshop
Next, move to editing. Open both images in Photoshop. Use the pen or quick selection tool to pick the clothes. This might take time, especially with complex designs. After selecting, create a mask and invert it to remove the model or mannequin. Then, place the garment over the plain background or dummy. Finally, adjust levels and colors for a natural look.
Now, we describe the step-by-step process of photography and editing.
Part 1: Ghost Mannequin Photography
To create the ghost mannequin effect, first, take clear photos of your clothes. Here’s what you’ll need:
Location: You don’t need a studio for great photos. A simple home setup is enough as long as there’s space for the mannequin and lights. Keep the area clean and clutter-free to ensure the clothes take center stage.

Background: A good background is crucial for simplifying the editing process. You have a variety of choices available:
- Clothing Fabrics: Use neutral fabrics like silk, velvet, or cotton. They keep the focus on the clothing. Silk’s sheen and velvet’s softness add contrast to photos.
- Seamless Papers: Professionals favor these for their variety and clean look. Bold colors like navy blue or emerald green add sophistication.
- Collapsible Backdrops: These are portable, easy to set up, and match your mood. For example, a bright yellow backdrop brings happiness and energy.
- Canvas: Adding texture and an artistic touch, canvas backdrops can elevate your photos to the next level. Just make sure the canvas complements the clothing you’re shooting.
- Board: A simple painted or fabric-covered board can also work well. You can be creative with the design and color to match your brand’s look.
- DIY Background: If you’re on a low budget, try a bedsheet, curtain, or fabric. They can add a unique texture and color. Get creative and have fun with it.
Mannequin: Choosing the right mannequin is key to achieving the ghost mannequin effect. Consider the following factors:

- Match Mannequin to Clothes: Choose a mannequin that fits the clothing style. For formal wear, select a mannequin with an elegant pose.
- Look for Adjustable Parts: Mannequins with removable parts make editing easier and save time.
- Consider the Price: Mannequin prices start at about $100 and can go much higher. For serious ghost mannequin photography, a good mannequin is vital.
- Prepare Outfits: Ensure outfits are clean, wrinkle-free, and pressed. Plan angles and poses to highlight the clothing.
- Lighting Matters: Good lighting is vital. You can use natural or artificial light.
- Use Natural Light: Shoot during the day for soft light. Avoid harsh shadows by placing the mannequin near a window or outside during the golden hour.
- Artificial Light Source: Implement softbox lights for consistent, cloudy light. Position them to minimize shadows and create a flattering, three-dimensional effect.
Camera Settings

For the ghost mannequin effect, focus on these settings:
- Aperture: Set it to f/8 to f/11 for full garment focus.
- ISO: Keep it at 100-200 to avoid noise.
- Shutter Speed: Aim for 1/125 to 1/200 to prevent blur.
- Exposure: Adjust for proper lighting on the clothing.
- Color Space: Use sRGB for consistent colors.
Shoot
Everything is ready. Now, take the photos! First, shoot from various angles. This gives you options later. Consistently snap additional shots than you expect to use.
Part 2: How to Create a Ghost Mannequin Effect in Photoshop
Once you have your photos, edit them in Photoshop. This will create the ghost mannequin effect. Follow these steps:
Step One: Open the Image
Open the photo of the clothing in Photoshop. If you took multiple photos, you’ll need to open the one where the garment is positioned best.
Step Two: Duplicate Layer
Before making any changes, duplicate the image layer. This way, you always have the original image as a backup if anything goes wrong.
To do this, right-click on the layer and select “Duplicate Layer.” Name the duplicated layer something like “Editing Layer.”

Editing Layer
Step Three: Create a Clipping Path

Use the Pen Tool to draw a path around the garment. Carefully trace its edges, following the contours. This step is vital. It helps separate the garment from the background later.
Step Four: Remove Background

After completing the clipping path, you can remove the background. First, select the path. Then, right-click and choose “Make Selection.” Press CRL + Shit+I to invert the path. Finally, press Delete to remove the background from the garment layer.
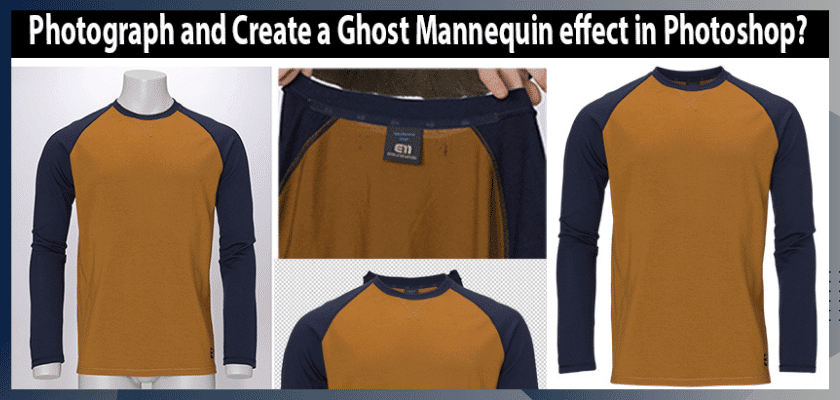
Step Five: Cut the Collar or Clothes Neck part

If you took a photo of the collar separately (like a close-up shot), open it in Photoshop. Use the Pen Tool again to trace around the collar. Once you have the collar selected, copy and paste it into the main garment image.
Step Six: Place the Clothes Neck part or Collar in the main Image

Place the collar / Clothes Neck part in its correct position on the garment. Use the Move Tool to adjust the placement until it looks like the collar is naturally attached to the clothing.
Step Seven: Create a Shadow

Add a shadow to make the garment look realistic. First, duplicate the garment layer. Then, fill it with a dark color, like black. Next, go to Filter> Blur > Gaussian Blur to soften the shadow. Finally, place the shadow behind the garment layer.
Step Eight: Delete Anchor Points

If there are any unnecessary anchor points left over from your clipping path, delete them to clean up the edges of the garment.
Step Nine: Create a New Path

If needed, create a new path for areas like sleeves or additional parts of the garment that may need more editing. This ensures that every part of the garment looks smooth and natural.
Step Ten: Change the Background Color

To change the background color, create a new layer behind the garment. Then, fill it with your chosen color. Online stores often use white or light grey. They help the clothes stand out.
Step Eleven: Save the File

Lastly, save your file in high resolution. For future editing, save it as a PSD For online use, export it as a JPEG or PNG.
3D Mannequin Effect Editing Tips
Creating a 3D mannequin effect requires precise editing. Follow these tips for a realistic result:
- Zoom in when selecting. This ensures clean edges. Small flaws can ruin the 3D effect. For example, focus on a model’s sleeves or hemlines to blend fabric with the background.
- Save an original copy of your image. Keep it in a separate file. This protects against mistakes. It saves you from losing work. Imagine losing hours of effort. A backup makes recovery easy.
- Play with shadows and highlights to add depth to clothing. Adjusting lighting creates volume and texture. For instance, a shadow under a dress fold suggests movement. Brightening a sequined top makes it look more luxurious.
The Power of the Ghost Mannequin Effect in Fashion E-commerce
The Ghost Mannequin Effect transforms how fashion brands and online stores showcase clothes. By removing the mannequin, this technique highlights the garment’s shape, fit, and details. It helps customers make better choices, as they can imagine the clothing on themselves.
For example, picture finding a beautiful evening gown online. With the Ghost Mannequin Effect, the dress seems to float. This draws attention to its design, silhouette, and fabric. Without a mannequin, it’s easier to imagine wearing the gown, increasing the chance of buying it.
Using this effect, brands can engage customers, boost sales, and build loyalty. It has become vital for e-commerce success, helping retailers stand out and stay ahead.
Conclusion:
Learning the Ghost Mannequin Effect can boost your clothing photos. This method makes clothes appear to float, showing shoppers how items will look on them.
With tips on photography and Photoshop editing, you can boost your clothes’ appeal. This will draw attention and help with online shopping decisions.
As online shopping grows, this effect makes your brand stand out and increases sales. Now that you know, grab your camera, take photos, and start editing! Your online store will shine.