
Have you ever wanted to make a picture’s background disappear? Or, maybe you’ve seen product photos online with perfect white backgrounds. And, you’ve wondered how they do it. The secret is something called a clipping path in Photoshop. It’s drawing a line around the object you want to keep. Then, it makes everything else vanish.
This blog post will teach you about Photoshop clipping path tools. We’ll also learn how to make a clipping path in Photoshop. So, let’s get started on this exciting journey.
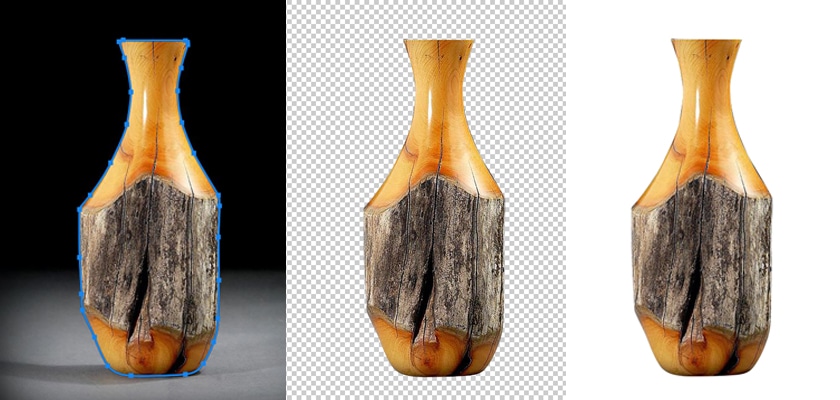
Clipping Path is a powerful Photoshop tool. It allows you to cut out any object precisely. A clipping path makes this possible. You draw a line around an object. This line tells Photoshop what to keep and what to remove. Picture a flower in a busy garden. A Photoshop clipping path lets you extract the flower. You can then edit or use it separately. This digital mask is key for professional results. It’s essential for photographers, designers, and editors.
Clipping paths are super important for lots of reasons:
- They help make product photos look clean and professional.
- You can use them to put objects on different backgrounds.
- They’re great for making catalogs and magazines look neat.
- Websites use them to make pictures look better online.
If you’re a budding photographer, a design student, or a photo enthusiast,
you should know how to make a clipping path in Photoshop. It’s a very useful skill.
Step-by-Step Process of Making a Clipping Path in Photoshop
Now, let’s make a clipping path. We’ll do it step by step. Don’t worry if you’re new to Photoshop. Just follow along, and you’ll create great clipping paths.
1. Image Preparation
Before starting our clipping path, we must prepare the image. Here’s how:
- Open the image in Photoshop.
- Ensure the image is large and clear. Small or blurry images make paths difficult.
- Zoom in on the image. This will help you see the edges better when you’re drawing your path.
2. Photoshop Pen Tool Mastery
The Pen Tool is key for making clipping paths in Photoshop. It might seem hard at first, but you’ll get the hang of it with practice.
Here’s how to use the Pen Tool:

- Find the Pen Tool in your toolbar. It looks like an old-fashioned pen tip.
- Click on the edge of the object you want to cut out. This makes your first anchor point.
- Click again to make more anchor points. You’re basically connecting the dots around your object.
Understand Anchor Points and Curves:

- Straight lines: Just click from point to point.
- Curves: Click and drag to create smooth curves that fit your object’s shape.
Don’t aim for perfection right away. The Pen Tool requires practice, but you’ll get better each time.
3. Path Building
Now that you know how to use the Pen Tool, let’s build our path:

- Start at a clear, defined edge of your object.
- Work your way around the object, placing anchor points as you go.
- For straight edges, use clicks. For curves, click and drag.
- Try to use as few anchor points as possible while still following the shape accurately.
- When you get back to where you started, click on the first point to close the path.
Remember, making a good clipping path in Photoshop is like drawing an outline. Take your time and be careful.
4. Path Refinement
After creating your basic path, it’s time to perfect it. Photoshop offers excellent tools for this.
Direct Selection Tool (A):

- This tool lets you move individual anchor points.
- You can also adjust the handles of curved segments to make them fit better.
Refine Edge Tool:

- This tool is great for making your path super smooth.
- It’s especially helpful for tricky areas like hair or fur.
Patience is Key:
Remember, making a great Photoshop clipping path takes time. Don’t rush. It’s better to spend a little extra time now to make it look perfect.
5. Creating the Selection
Your path is ready. Now, make it a selection:

- Open the Paths panel (Window > Paths if it’s not visible).
- Right-click your path, then select “Make Selection.”
- A box appears. Just click OK.
You’ve successfully created a selection from your clipping path in Photoshop.
6. Utilizing the Selection

Now that you have your selection, you can do all sorts of cool things:
- Remove the background: Just press Delete, and everything outside your selection will disappear.
- Add a new background: Make a new layer and put it behind your object.
- Apply effects: You can add shadows, glows, or other effects just to your selected object.
The possibilities are endless with your new clipping path.
7. Saving Your Clipping Path

Remember to save your work. Here’s how to save a clipping path in Photoshop:
- Go to File > Save As.
- Choose a format that supports paths like JPG, PSD, TIFF, or EPS.
- Make sure “Include Vector Data” or “Embed Clipping Path” is checked.
- Click Save.
Now, you can use this Photoshop clipping path again later or send it to others who might need it.
Advanced Techniques and Considerations
As you get better at making clipping paths in Photoshop, you might want to try some more advanced techniques:
Complex Objects:
Some objects are trickier to cut out than others. Things like hair, fur, or objects with lots of holes can be challenging. For these, you might need to use a combination of the Pen Tool and other selection tools.
Soft vs. Hard Edges:
Not all objects have clear, sharp edges. For soft edges, like clouds or fluffy toys, you might need to use feathering on your path to make it look natural.
Color Range Selection:
Sometimes, you can use the Color Range tool to help you make a clipping path. This is especially useful for objects that are a different color than their background.
Tips for Making Better Photoshop Clipping Paths
Here are some tips for creating clipping paths in Photoshop:
- Zoom in for better accuracy.
- Use fewer anchor points for smoother paths.
- Take breaks to rest your eyes.
- Practice with the Pen Tool to improve.
- Consider a graphics tablet for easier work.
Expert Tips for Creating Clipping Paths in Photoshop
Want to improve your clipping paths? Here are some tips from pros:
- Learn shortcuts: They make your work faster.
- Use “Preview”: See your path as you create it.
- Experiment with Pen Tool modes: Different modes suit different shapes.
- Don’t hesitate to redo: If something’s off, delete and try again.
- View the whole image: This helps spot needed fixes.
Conclusion
We’ve discussed clipping paths in Photoshop. We began from the basics, and now you can create them. Remember, practice makes perfect. Now, you’re ready to start.
Clipping paths are valuable in many jobs. Clipping paths in Photoshop are vital for photographers, graphic designers, and photo lovers.
So, why wait? Open Photoshop, pick an image and start. Soon, you’ll create amazing clipping paths and stunning images. Happy clipping!
FAQ
How to create a clipping path in Photoshop?
Making a clipping path in Photoshop is simple. Here’s a brief summary:
- Launch Photoshop and open your image.
- Select the Pen Tool.
- Click around your object to create a path.
- Close the path by clicking on the starting point.
- In the Paths panel, right-click and choose “Make Selection.” That’s it. You’ve created a clipping path.
How to save clipping path in Photoshop?
Saving your clipping path is important. Here’s how:
- Open File > Save As.
- Select PSD, TIFF, or EPS.
- Ensure “Include Vector Data” or “Embed Clipping Path” is checked.
- Click Save. Your clipping path now has the image.
How to use clipping path in Photoshop?
Once you’ve made a clipping path, you can use it in many ways:
- Remove backgrounds: Just delete everything outside the path.
- Add new backgrounds: Put a new layer behind your object.
- Apply effects: Add shadows or glows to your object.
- Make masks: Turn your path into a layer mask. The possibilities are endless.
What is clipping path in Photoshop?
A clipping path in Photoshop acts like a virtual cutting tool. You draw it around an object to isolate it from the background. This allows you to remove backgrounds, add new ones, or apply effects to specific image parts. It’s essential for editing photos and achieving professional images.
Is it the same as making a cut path?
Yes, A clipping path and a cut path mean the same thing in Photoshop.
How do clipping masks work?
Think of a clipping mask like a see-through window in the shape of something. You put one picture under another. With a clipping mask, you only see the bottom picture through the shape of the top one! To make one, put the shape picture on the bottom and the desired picture on top in Photoshop. Then, click a special button between them.
Can JPGs have clipping paths?
JPG pictures can’t store clipping paths inside them. But, you can save a special Photoshop file (.PSD) with the path. Some other programs can see this clipping path when you use the Photoshop file.