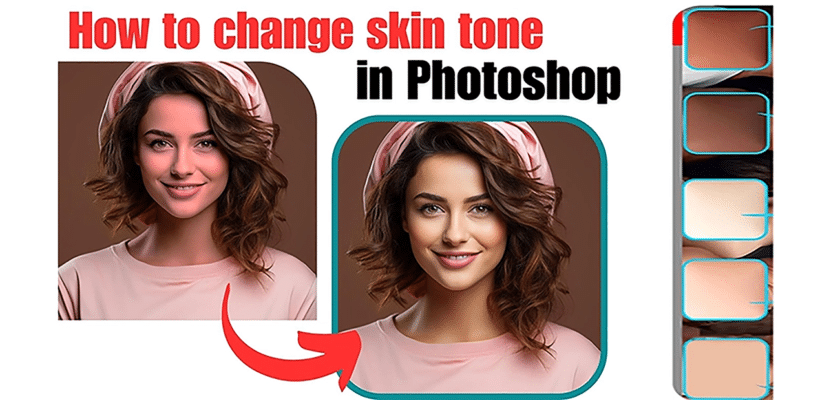
After photography, the skin tone is not always perfect. The principal photography begins when the object is crisp and clear. And skin tone or color plays a major role when it’s about human photography or baby photography. If you want to do Photo retouching, like enhancing skin tone or changing skin color in Photoshop, you must understand the topic well. For that, you can use the auto blend function and then select the naturally highlighted areas of the face like the nose, cheeks, etc.
Table Of Contents
-
- Why Does Changing Skin Tone Matter in Photoshop?
- How to change skin Color in Photoshop? Step-by-Step Guide.
- Auto Blend Layers Method
- Adjustment Layers Method
- Selective Color Adjustment
- Curves and Layer Masks
- How to Match Skin Tones From Another Photo in Photoshop – Step by Step
- What Is the Layer Mask in Adobe Photoshop?
- Conclusion
- FAQ
Why Does Changing Skin Tone Matter in Photoshop?
Think of Photoshop as a magical toolbox for pictures. Inside that toolbox are special tools that let you change skin tones, including skin color. But why would anyone want to change skin color in a picture? Here are a few reasons why it’s important:
1. Making Everyone Look Their Best:
Sometimes, pictures don’t show how people look. Maybe the lighting was weird, or someone’s skin looked too red or pale. Changing skin color in Photoshop is like putting on makeup. It evens skin tones, removes blemishes, and creates a healthy glow.
2. Telling a Story with Pictures:
Have you seen movies where characters change skin color to show illness or aging? Photoshop does this, too. You can then tell a story. For instance, imagine a superhero turning green when angry. Or a fairy tale character with mood-based skin color.
3. Creating Cool Effects:
Photoshop lets you get creative with skin color! You can make someone’s skin look like it’s made of gold or give it a rainbow glow. Many other colors are available, so you can choose your favorite.
4. Making Product Pictures Look Even Better:
Sometimes, people in pictures model clothes or jewelry. However, everyone’s skin is unique. So, clothing colors might not suit everyone. Yet, Photoshop can adjust a model’s skin color to match the product. This enhancement makes the image more appealing.
5. Fixing Mistakes:
If a picture is off, Photoshop can help. Maybe the colors are wrong, or the skin tone is uneven. With a few clicks, you can easily fix it. It’s like having an eraser for picture mistakes.
Changing skin color in Photoshop is crucial. It improves the photos and storytelling and can also increase product sales.
How to change skin Color in Photoshop? Step-by-Step Guide.
There are many ways to change skin tone. By following the given guides, you can change skin color. Let’s explore how to change it:
Method 1: Auto Blend Layers
The auto-blend layers method is best for changing skin color or seamlessly blending skin tones from two images.
1. Preparation:
(I) Open both your main image, which you want to adjust, and a reference image with the desired skin tone.
(II) Ensure that both images are aligned and have similar lighting conditions.
(III) In the main image, make a new layer by going to the Layer option, then click “new Layer. And give a name of the Layer, like “Skin Tone Adjustment.”
2. Selection:
(I) Use the Quick Selection tool (W) to carefully select the skin in your main image. Take your time to be precise, as a clean selection is crucial for a natural-looking result.
(II) For finer details, use the Refine Edge brush tool to adjust the selection’s edges.
3. Copy and Paste:
Copy the selected skin area from the reference image (Ctrl/Cmd + C) and paste it onto the “Skin Tone Adjustment” layer in your main image (Ctrl/Cmd + V).
4. Auto-Blend Magic:
(I) Go to Edit > Auto-Blend Layers.
(II) Select “Stack Images” and check the “Seamless Tones and Colors” option.
(III) Click “OK” and let Photoshop work its magic! It automatically blends the two skin tones, creating a smooth transition between them.
5. Refine the Mask:
In Photoshop, let’s create a layer mask for blending control. Use the Brush tool (shortcut: B). Paint areas are black to hide and white to reveal. This method fine-tunes the blend for a natural look.
Method 2: Adjustment Layers
Use adjustment layers for safe editing. They let you change colors without touching the original image pixels. Add Adjustment Layers:
- Follow those steps to create a new Hue/Saturation adjustment layer. Click here to create the Hue/Saturation layer using the New Adjustment Layer option.
1. Hue/Saturation Adjustments:
(I) In the Hue/Saturation layer, pick the “Reds” channel from the menu.
(II) Drag the Hue slider left or right. This adjusts the overall skin tone.
(III) Use the Saturation slider. It controls how intense the Color is.
(IV) Adjust the Lightness slider. Use it to make the skin brighter or darker.
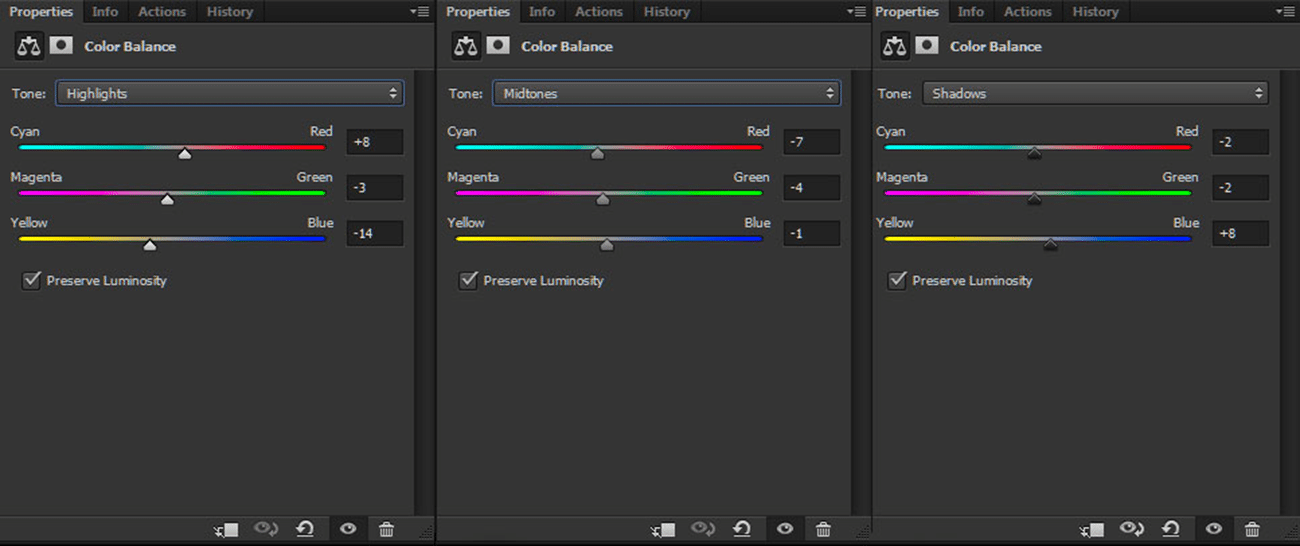
2. Color Balance Adjustments:
(I) Try adjusting the sliders for Shadows, Midtones, and Highlights. Do this in the Color Balance layer.
(II) Change the Color to Cyan/Red, Magenta/Green, or Yellow/Blue, which will change the skin tones‘ color balance.
Method 3: Selective Color Adjustment
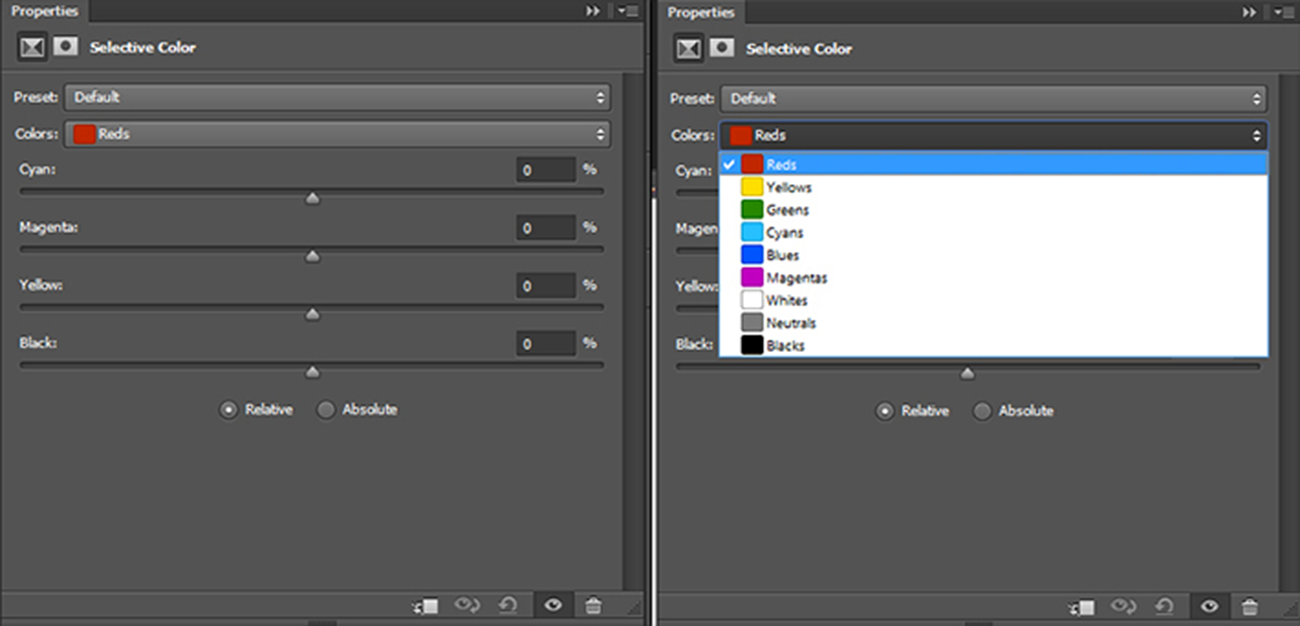
Selective Color gives you exact control over color ranges. It is a powerful tool for fine-tuning skin tones.
- Create a Selective Color Layer: go to layer, then make a new adjustment layer.
- Select Colors: Choose “Reds,” “Yellows,” or”Whites” from the Colors menu. These colors mainly influence skin tones.
- Fine-Tune Colors:
Adjust the Cyan/Red, Magenta/Green, Yellow/Blue, and Black sliders for each Color. Use them to get your desired effect.
Method 4: Curves and Layer Masks
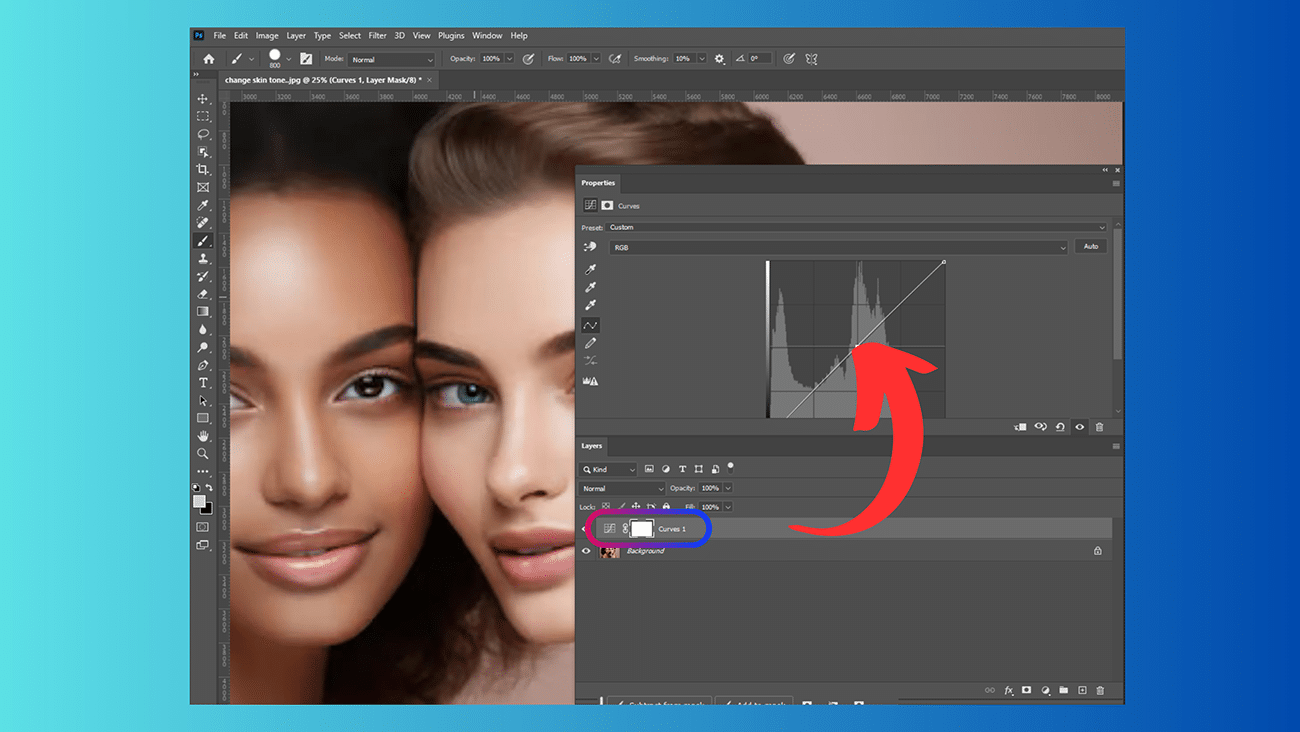
Curves offer great control over an image’s tones. They allow for advanced color tweaks.
- Create a Curves Layer: Create a Curves Layer with a new adjustment layer. Then click Curves.
- Shape the Curve: Click on the curve to make anchor points. You can then adjust the brightness and contrast of different tonal ranges in your image.
- Protect Non-Skin Areas: Add a layer mask to the Curves layer. First, go to Layer, then Layer Mask, and select Reveal All. Next, use a black brush. Paint over the areas you want to keep unchanged. This ensures the Curves effect only alters the skin.
- Use the Targeted Adjustment Tool:
- In the Hue/Saturation and Selective Color adjustment layers, use the Targeted Adjustment Tool icon. Click and drag this tool on your image’s skin to adjust colors.
- Experiment with Different Blending Modes:
- Try changing the blending mode of your adjustment layers. This will test different effects. For subtle, natural enhancements, use “Soft Light” or “Overlay.”
- Start with Small Adjustments: Make small adjustments. Gradually build up the effect to avoid over-correcting the skin tones.
How to Match Skin Tones From Another Photo in Photoshop – Step by Step
Here is a full guideline on how to match skin tones from another image in Photoshop. We will explain it step by step with clear and short instructions.
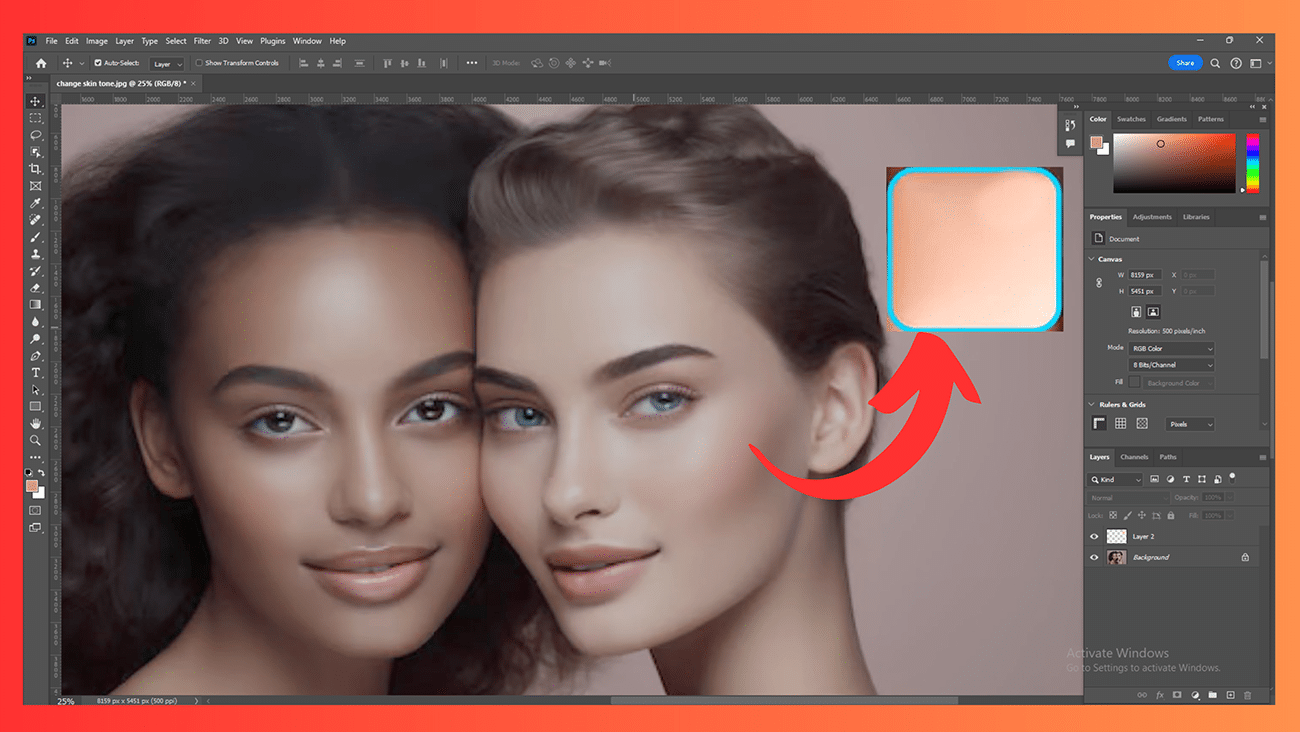
Step 1: Open Your Images
- Launch Photoshop and open both the image you want to adjust (the “target” image) and the image with the desired skin tone (the “reference” image).
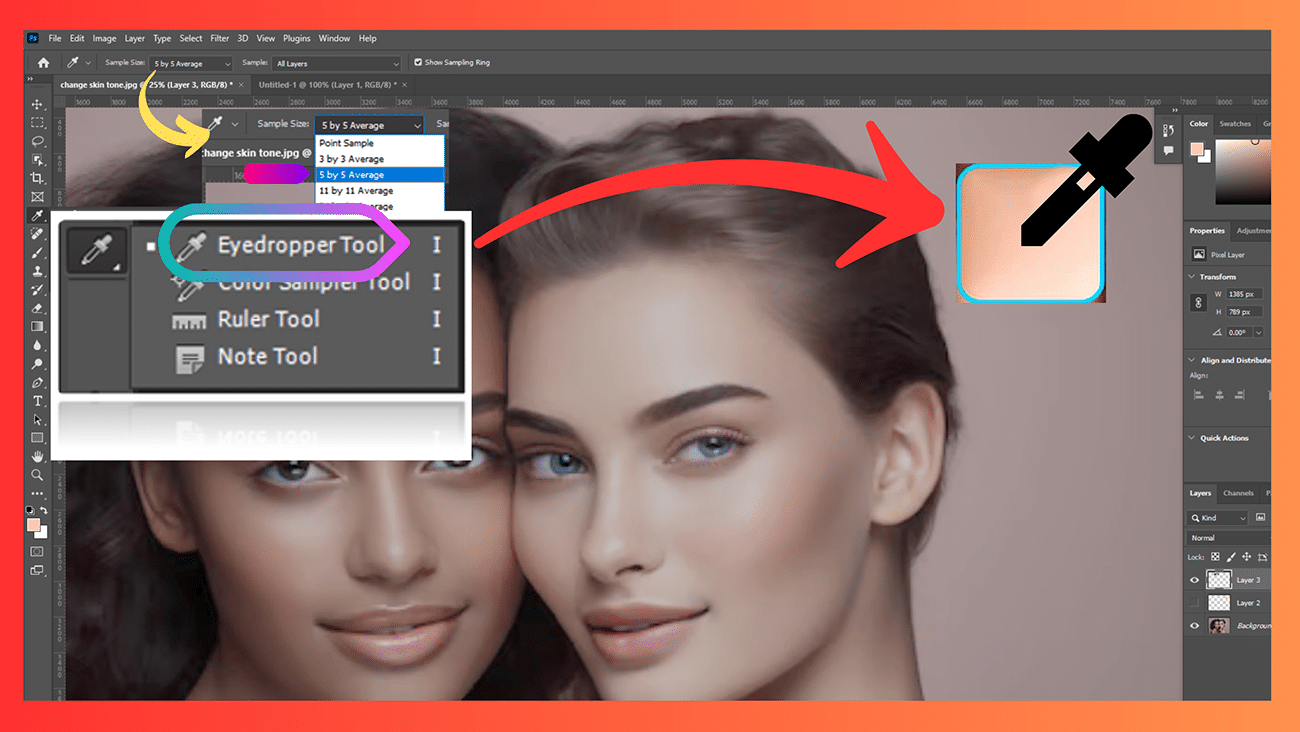
Step 2: Sample the Reference Skin Tone
- Activate the Eyedropper Tool (I).
- In the Options Bar, select “5 x 5 Average” for Sample Size.
- Click on the reference image to sample a skin tone you want to match.
Step 3: Create a New Layer
- In the target image, create a new blank layer (Layer > New > Layer).
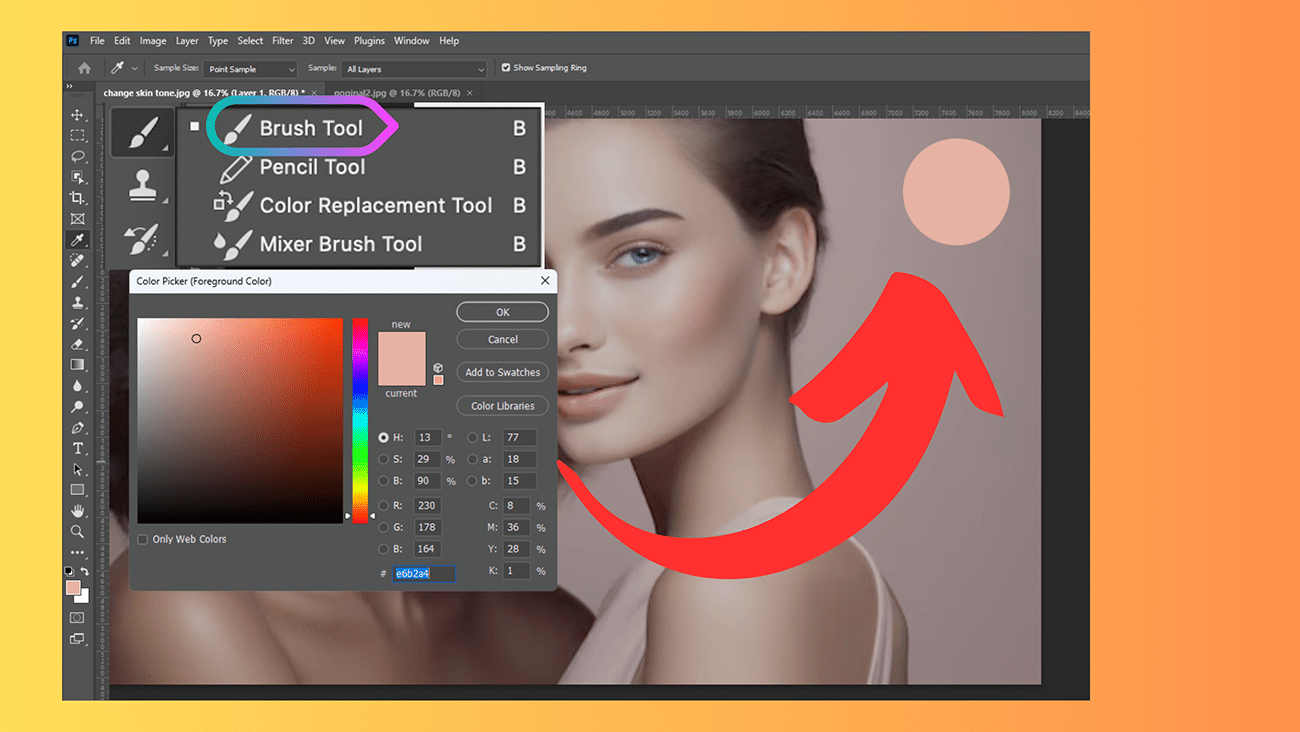
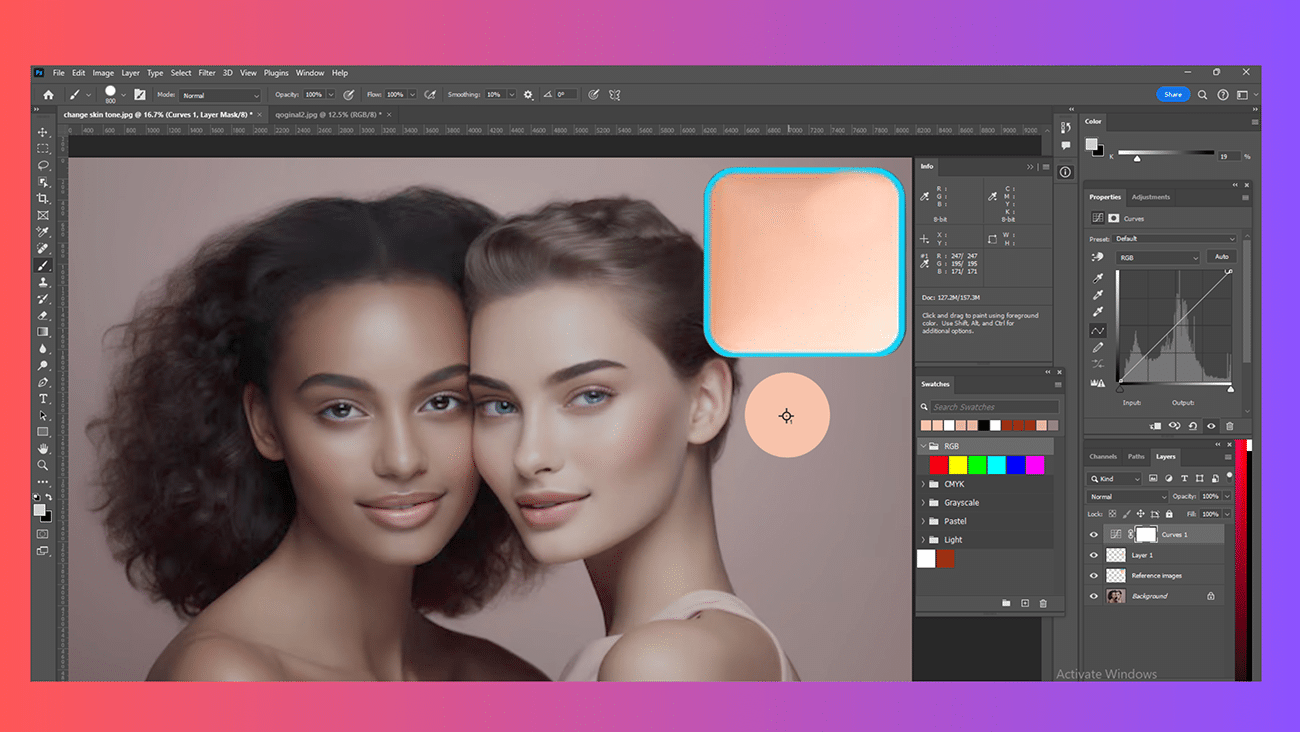
Step 4: Paint a Swatch
- Select the Brush Tool (B).
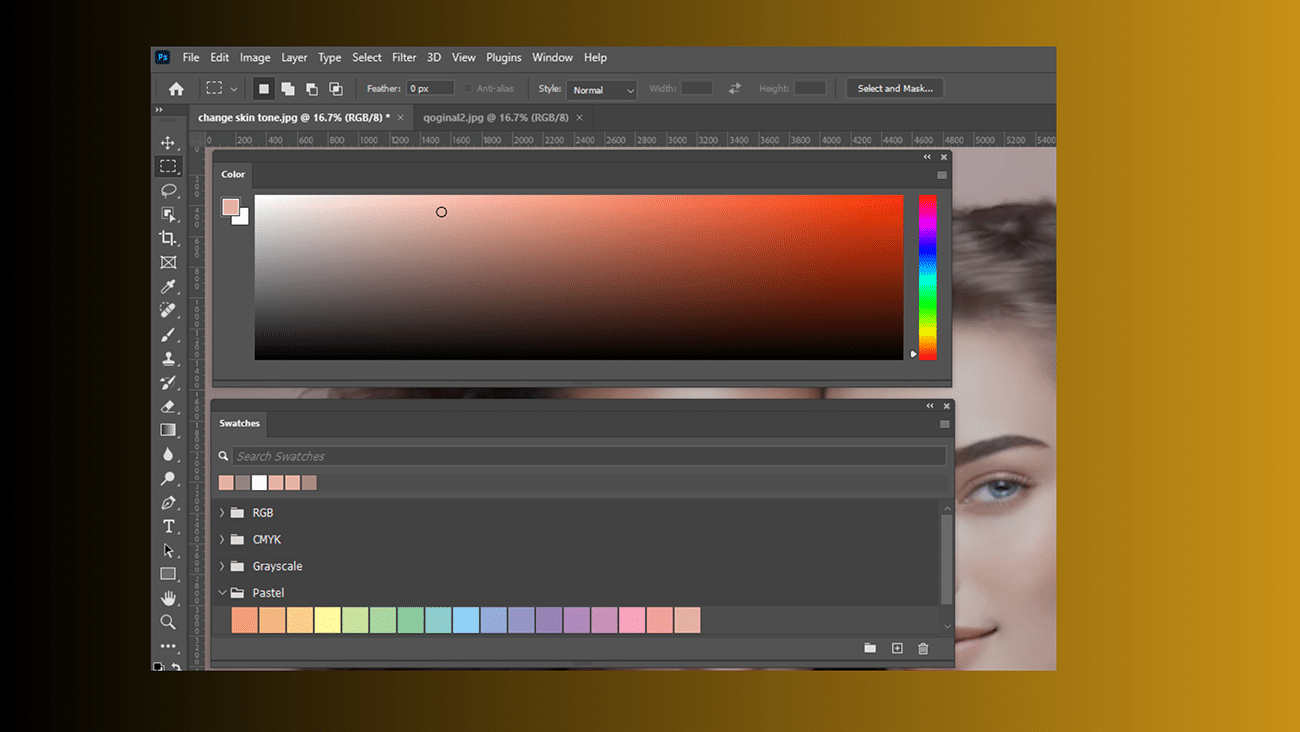
- Ensure the foreground color is set to the sampled skin tone from the reference image.
- Paint a small swatch of this Color on the new Layer next to the skin area you want to adjust.
Step 5: Sample the Target Skin Tone
- Hold down the Alt/Option key and click on the target image to sample a skin tone you want to change.
- Paint another small swatch of this Color next to the previous swatch on the new Layer.
Step 6: Create a Curves Adjustment Layer
- Click the “Create new fill or adjustment layer” icon. It is at the bottom of the Layers panel.
- Choose “Curves.”
Step 7: Sample the Swatches
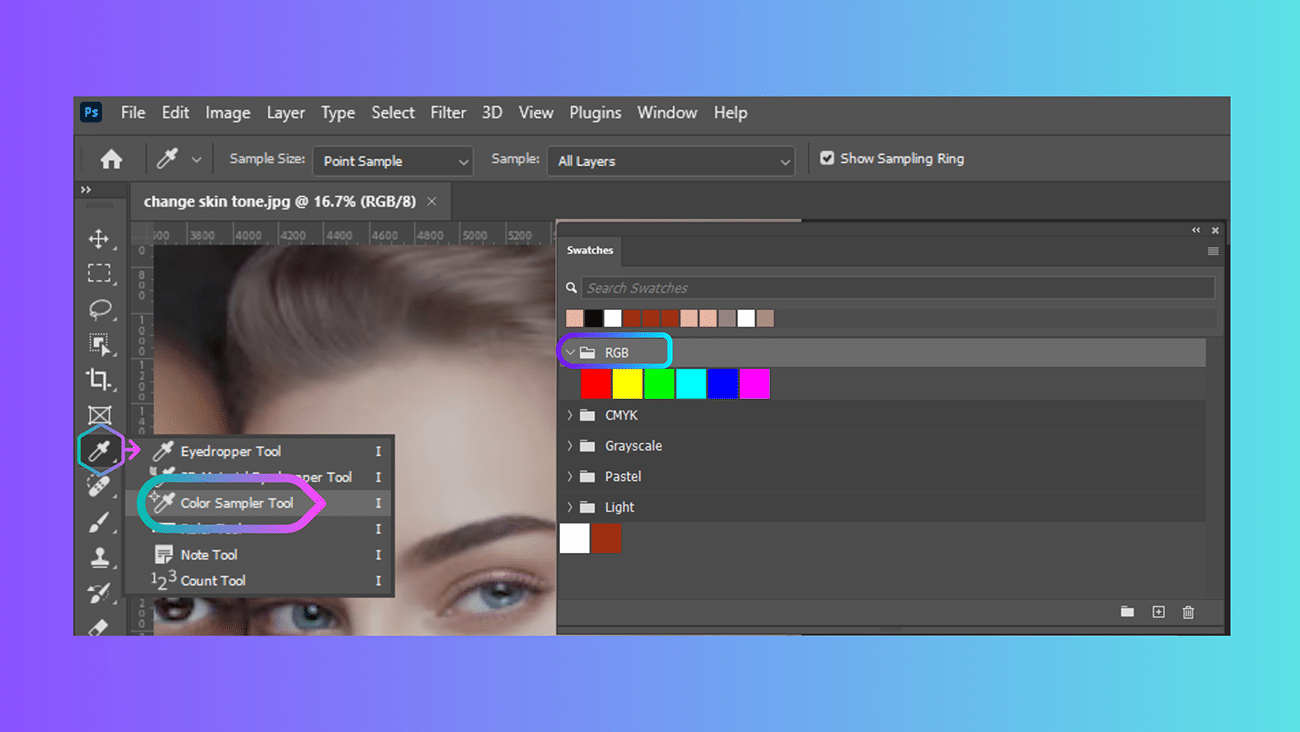
- Activate the Color Sampler Tool (hidden under the Eyedropper Tool).
- Click on each swatch you created to display their RGB values in the Info panel.
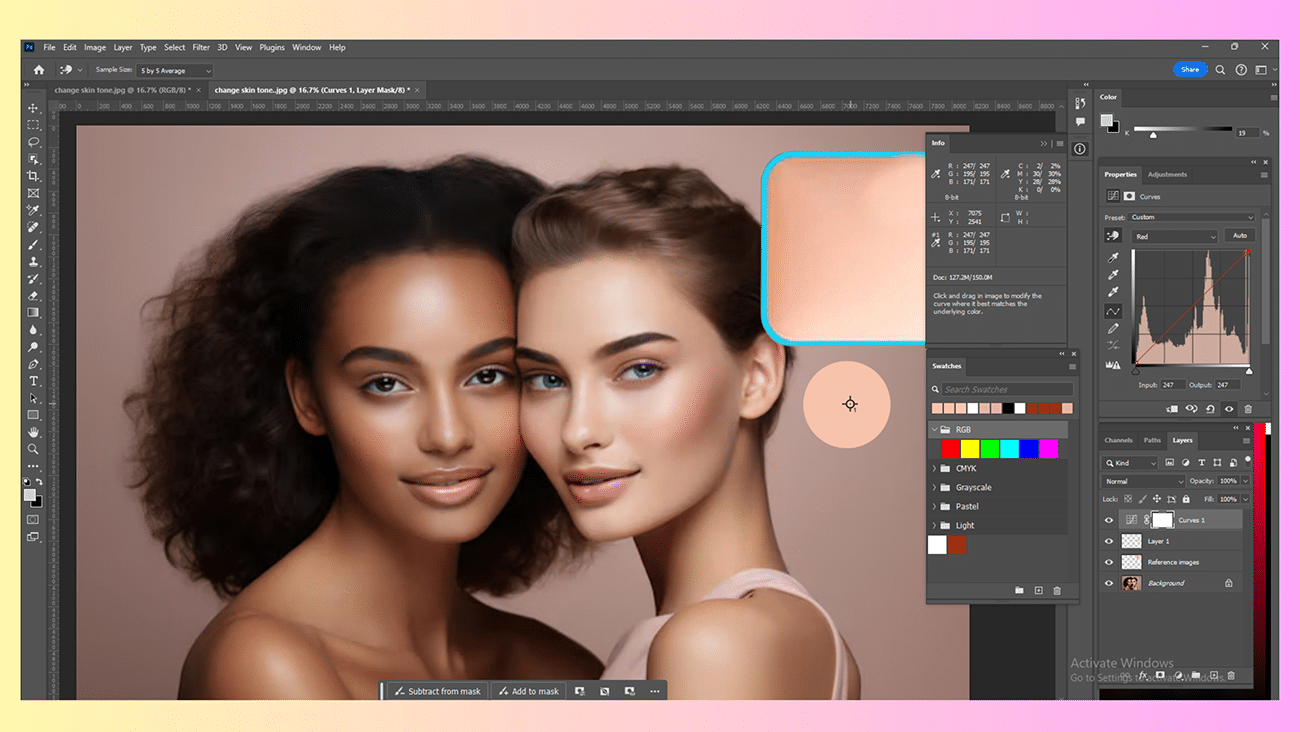
Step 8: Match the RGB Values
- In the Curves adjustment layer, click on the channel dropdown menu and select “Red.”
- Click on the curve to add a point where the input value matches the Red value of the target skin tone swatch.
- In the Output field, enter the Red value of the reference skin tone swatch.
- Repeat this process for the Green and Blue channels, matching the corresponding RGB values from the reference swatch.
Step 9: Fine-tune with a Layer Mask
- If the change affects areas you don’t want to change, add a layer mask to the Curves layer.
- Use a black brush to paint over those areas, masking the adjustment.
Additional Tips:
- For complex skin tones, you should add multiple points to the Curve adjustment layer for each channel.
- Try different blending modes for the Curves layer. They help you fine-tune the results.
- Use the Adjustment Brush. It is in the Curves panel. It’s for more targeted adjustments.
Follow these steps. You can match skin tones between photos in Photoshop. This ensures a consistent and natural look. This technique is ideal for portrait retouching and composite images. It’s also great for matching skin tones in group photos.
What Is the Layer Mask in Adobe Photoshop?
In Photoshop, a layer mask picks image parts. It hides what you don’t want to show. So, a layer mask is quite helpful regarding face swaps. Maybe it lets you keep the parts of the face you want. Then, you can replace the other parts with a different face. When you use the auto blend feature, Photoshop automatically creates the layer mask.
To your knowledge, the layer mask uses black and white to help identify the exposure areas. That means the black areas are hidden, and the white areas are exposed. Next, a paintbrush tool can apply white or black to the picture for more controlled accuracy. A layer mask is also helpful for other things. For example, it can remove an element from an image.
Conclusion:
Photoshop offers many ways to change skin tones. These include auto-blend layers, adjustment layers, selective color adjustments, and curves. Make small changes. Try different blending modes. This is key to get the result you want. In addition, you can match skin tones between photos. You can do this using techniques such as sampling and adjusting RGB values.
FAQ:
How do I change my skin color in Photoshop?
-
- Blending: This tool is like mixing different paint colors to find the perfect one. Photoshop can mix the colors in your picture. This makes your skin look more even and natural.
- Highlights: This tool adds a little extra light to the parts of your face that stick out, like your cheeks or nose. It makes your skin look glowy and healthy.
- Selective Color: This tool allows you to alter specific colors, such as the reds and yellows in your skin. It acts like a selective eraser, removing only those colors.
- Curves: This tool is advanced, acting like a color light switch. It can make your skin brighter or darker.
How do you recolor a product in Photoshop?
- Hue/Saturation: This tool allows you to slide a bar and change your car’s Color from red to blue. You can also adjust the brightness.
- Replace Color: This tool is like a magic wand that lets you pick a color you want to change, like the red of the car. Then, you choose a new color, like blue, and poof! The red parts of the car turn blue.
How do I change the color of an item in Photoshop?
You can change a product’s Color. You can do it using the same tools. The Hue/Saturation and Replace Color tools work well for this.
How do I change the color of an item in Photoshop?
How do I color-correct a product in Photoshop?
How do I fix the Color of an image in Photoshop?
How does Color correct an image?
- Look at the picture. See if the colors are too warm or too cool.
- Pick the right tool for color correction. Levels and Curves are good for adjusting the overall brightness and darkness.
- Play with the sliders in the tools until the colors look just right.
- Compare the picture before and after you made changes to see if it looks better.

