
Using mannequins for product images is an efficient and cost-effective way to promote your items. Mannequins help your products hold their shape, making images look more professional and consistent, which can boost their appeal to customers.
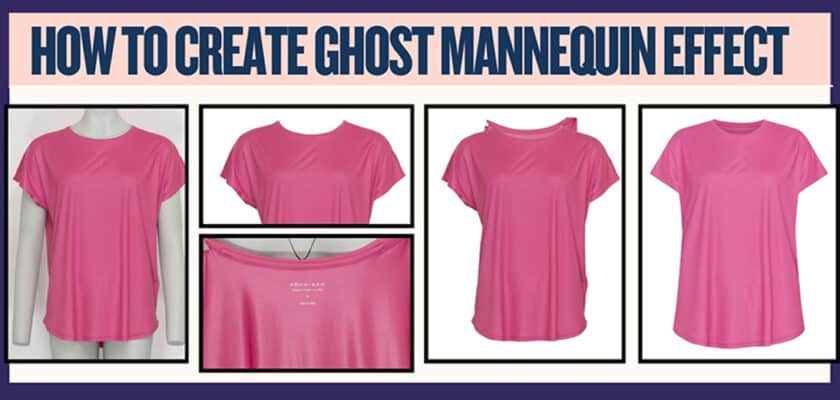
However, mannequins can be distracting. A great alternative is the ghost mannequin effect, as shown below.
At first, achieving this Effect may seem difficult, especially for non-professional photographers. But, like any challenge, it becomes easier when broken down into small steps. To create this Effect, you’ll need to combine two images of the product. It’s essential to take good product photos to make post-production easier. Follow the given simple guide to learn how to use image editing and create a ghost mannequin effect for your e-commerce Apparel photography.
How to Create the Ghost Mannequin Effect
1. Selecting and Posing a Model or the invisible Mannequin
In fashion photography, models or mannequins are often used to showcase the shape and fit of products. However, including them in every image isn’t always the best approach. Many retailers take photos of products on models and then remove them in Photoshop to create a “ghost mannequin” effect.

For smaller retailers who handle their own image editing, mastering this technique can be tough. To achieve the ghost mannequin effect, start by photographing your product on a model or mannequin from multiple angles. You can then use these images alongside your ghost images in product galleries.
If you opt for a real model, have them strike a static pose. Keep their styling minimal and tie up long hair to avoid blocking the product. This will make the editing process simpler.
There are many types of mannequins to choose from, with or without arms, hands, legs, or a neckline, depending on your needs. If your mannequin has limbs, make sure they can be positioned outside the frame.
Pro Tip
White matte mannequins don’t reflect light. They easily blend into white backgrounds, making image editing a breeze.
Make sure your product fits the mannequin or model perfectly. Choose the right size or style the garment to fit well. If your product has sleeves, point them down. This helps prevent viewers from seeing inside the sleeves.
2. Setup and Equipment
To use the ghost mannequin technique, you need high-quality studio photographs. Low-quality photos will make the ghost mannequin effect less appealing. To get the best results, pay attention to camera settings, lighting, equipment, and placement for each product you photograph.
Set up your DSLR settings.

Here’s exactly how to use your DSLR camera’s settings to capture great product images. For inspiration, take a look at this professional demonstration of a ghost mannequin photoshoot by an e-commerce photo studio.
3. Photographing the product

When taking pictures of shirts, place the camera at chest level. For bottoms, position it across from the hip area. Avoid shooting from extreme angles, as this can make the garment appear tapered and misleading.
Here are two example photos of a tank top on a mannequin. The left image, taken from below chest height, creates an unflattering view. In contrast, the front and back image on the right, taken at chest height, shows the product in a much more flattering way.
Shooting from chest height offers a flattering view of the product.
Using a telephoto zoom lens can reduce distortion in your images. It also lets you get closer to small objects and farther from large ones.
Make sure your studio is spacious enough to accommodate your camera and tripod during invisible mannequin shoots. You’ll need two studio lights with umbrellas positioned evenly on either side of the product and a backdrop.
Create an image with the ghost Mannequin torso. Technique:
- Start by taking photos of your product from the front and back while it’s worn by a mannequin or model. Next, style and hang your product on a piece of white foam board. Then, photograph the front and back views again. These foam board shots will help you show the inner areas of the garment when you combine the images, as shown below.
- For collared shirts and similar items, ensure the top is open, making the inner back clearly visible. You may even want to turn it inside out in some cases.
Post-Processing Images: A Step-by-Step Guide
Making a ghost mannequin effect is effortless once you obtain the right shots. You need proper post-production software, like Adobe Photoshop, and well-taken product photos. You can also hire professional editors to get your ghost mannequin images back in 24 hours, ready for sale.
Outsourcing this work can save time and reduce frustration. However, if you need to edit the images yourself due to budget constraints, follow these seven simple steps to create your ghost mannequin effect in Photoshop.
1. Open Your Files in Photoshop and Create Layers

Unlock your creativity by opening the mannequin and foam board images in Photoshop. Next, select the mannequin, and let’s dress it up with a new background layer.
Fill this layer with white. When you’re finished, this will be your overall background. To stay organized and easily identify each one, label your layers.
2. Use a Selection Tool to Select the Product in the Mannequin Image

Start by selecting the product in your mannequin image. Zoom in for a closer look. Next, pick your preferred tool from the treasure trove of options: quick selection, lasso, or magic wand.
All three tools can help you make the right choice.
Remember, using a white background when shooting makes it easier to remove the mannequin. The color separation between the product and the background helps a lot.
3. Refine and Place Your Mask
After selecting the entire product, tighten your mask. This will remove the background and mannequin.

Go to the “Select” menu and use the “Refine Edge” tool. Click “OK” in the “Refine Edge” dialog. Then, apply a mask to your shirt layer.
Now, your product should float on the white background you created earlier. If needed, refine the mask or edges again to achieve a clean appearance.
4. Rinse and Repeat the Previous Steps with the Foam Board Image.

Now, change direction and redo Steps 1, 2, and 3 on your foam board product image. This type of image may seem odd at first. However, it’s important. Photographing the product inside-out shows the inside back. This completes the mannequin illusion.
We promise it will look great in the end! Create a new layer, select the product, and refine your mask.
5. Combine the Images with the Product photo without the mannequin and neck image

When both pictures are equipped with sharp, tidy masks, move the mask from your foam board image to the wraith-like mannequin image.
Next, arrange the layers. The foam board image should be below the mannequin image.
Next, reposition the foam board layer like a puzzle piece. It should nestle snugly behind the mannequin layer, curving gently just below the shoulder for a flawless fit.6. Remove Unnecessary Parts of the Foam Board Layer.
Now, hide your mannequin layer and brush away the extra parts of the foam board layer.
Keep only the neckline triangle between the shoulders. Also, notice the string across the back in the video below.
Remove that part from the foam board image. It’s already included in the mannequin shot.
After that, double-check your layers. Ensure everything is clean and aligned, especially around the neck and shoulders.
7. Add Shadows and Save

Add a shadow dance between the layers to add depth and dimension. For peace of mind, save a copy of your Photoshop masterpiece with all layers preserved.
Once you’ve saved the layer file, it’s time to merge magic. Flatten those layers, blending them into a seamless canvas. Now, save your masterpiece as a new file. This final flourish will elevate your image to professional and realistic heights!
If done well, you’ll achieve an amazing 3D effect like the examples below. This will enhance your product photography and boost sales in your online store.
Unlock the secrets of professional apparel photography with the ghost mannequin effect. Follow these easy steps to create stunning images that captivate. For a treasure trove of examples featuring diverse apparel, grab our complete guide to ghost mannequin, Clothing Neck Joint magic.
Conclusion:
Keep in mind: this Effect transforms your products into eye-catching masterpieces. It elevates your online store into a realm of professional elegance. Your brand will stand out in customers’ eyes, leading to increased sales.